HOW TO BUILD A CAMPER VAN:
P L U M B I N G
In this section we’ll cover :
Heater options
Hot water options
Cooling options
Safety
Ventilation
Installation
Let’s get started.

Contents

Water consumption

Showers & hot water

Pipes

Water tanks

Sinks & shower trays

Installation

Toilets

Pumps
Many of the products that appear below are either Amazon or eBay affiliate links. We earn a small commission on sales at no extra cost to you.
In this guide we’ll talk you through all the details of DIY campervan plumbing.
We’ll talk you through all the details of plumbing for your camper van conversion. Whatever your budget and van conversion plan, this guide contains everything you need to know about deciding on a water tank size, choosing a camper van toilet, showers and hot water options, which pipes and fittings to use and plumbing diagrams and installation guides.
Let’s dive in.

P L U M B I N G
Water consumption
Working out how much water storage you’ll need in a campervan can be tricky, especially when you’re moving from a house into a van. Nobody closely monitors their water usage in a house, but in a van every litre counts and you’ll become acutely aware of every drop that goes down your drain when you personally have to fill and empty your water tanks.

Filling our water bottles in the Armenian highlands.
So you might be wondering…
How big a water tank do I need for my van conversion?
How much water does a campervan shower use?
How much water can a campervan hold?
Here is an average estimate for daily water consumption per person:
Drinking water: ~2L
Cooking and hot drinks: 1-2L
Washing up: 1-2L
Brushing teeth: 250ml
Shower*: 5-25L
Flushing toilet**: <1L
*Showers can use anywhere between 3L and 12L a minute depending on the flow rate of your water pump
**Not all campervans have a flushing toilet so this number can be disregarded if not
How much water you will use is a personal matter, and how much water you’ll need to carry will depend on several factors:
Your lifestyle and style of travel
How much water you’ll consume weekly
Which areas and climates you’ll be travelling to
The first thing after working out your estimated water consumption to consider is the availability of filling stations or taps. In Western Europe these are generally abundant and free, or available at motorhome service stations and aires for a fee. However across Eastern Europe and beyond water quality can become questionable, and in arid areas or dry seasons some water sources may dry up; equally after heavy rain springs can become tainted. Have a good think about the areas you might be travelling through before deciding how much onboard water storage you’ll need.
If you plan to mainly stay on campsites and aires you’ll have likely access to a continuous supply of water and will not need to carry so much onboard.
If you plan to mainly wild camp and stay off-grid for long periods you may need a large onboard water storage tank for prolonged periods away from water sources.
To find water filling stations across the UK and Europe you can use Park4Night or iOverlander.
In France all drinking water points can be found on Eau Cyclisme.

P L U M B I N G
Water tanks
One of the most vital parts of any van conversion is a continuous source of water, an essential part of daily life no matter whether you live in a vehicle or a house. Water storage should be the foundation to any van conversion whether you have a small jerry can or a underslung fresh and waste water tanks.

In this section we’ll discuss considerations, types of water tank and how to clean them as well as water tank accessories.
Considerations:
Size
What size water tank you need for your campervan will depend largely on two things: how much water you’ll consume, and how long you’ll likely go between filling up. Aside from monitoring your own personal water use a good base estimate would be a minimum of ~4L per person per day for drinking, cooking and cleaning. Showering, washing and water for pets will of course use more water on top of this.
How long the stints will be between filling up is also an important factor to consider: will you be travelling to places with an abundance of springs or filler stations, or will you be camping way out in the desert where there’s not a drop in sight? If you’ll be traveling a lot through wild areas you might want to factor in a slightly bigger or extra tank to give you those all-important reserves you need, because nobody wants to run out of drinking water in the middle of nowhere.

Weight
Your vehicle’s payload is an important consideration when deciding on the size of your tank. Remember that 1 litre of water weighs 1kg. A small van may not have the payload to carry underslung water tanks like a large van.
It’s very important to balance the weight of your full tank with the other items in your van; i.e. if you’re planning to carry a lot of water, don’t fit the water and fuel tanks on the same side, or your van could end up leaning over to one side.

A small van won’t be able to carry as much water due to its lower payload.
Climate
Fitting an underslung water tank could make it vulnerable to freezing, so be aware of this if you are planning to travel to colder climates. Fitting an electric heating element or water tank heating pad coupled with good insulation could be a lifesaver for your plumbing if you’re planning a ski season.
Equally prolonged periods of travel in hot weather can cause faster water stagnation if you’re not regularly replenishing your supply. In this case use of water tank sterilisation tablets on a regular basis will protect you from water-borne diseases, but it’s still not recommended to drink from your motorhome’s tank.

Material
Most van water tanks are made of BPA-free food-grade plastic such as polyethylene, however do check that this is the case or the chemicals from the plastic could end up leaching into your water. This doesn’t matter if you’ll be keeping a separate drinking supply, although some people find that even food-grade plastic containers give their water a funny taste, so you may want to consider an alternative material such as stainless steel for this.

Look for something along these lines when buying a water tank to ensure it’s safe to drink from.
Sterilisation
Keeping your water tanks clean and sterile is an important task as sitting water can quickly become slimy and grow bacteria such as legionella.
Flush them out with cleaning solutions or natural products such as vinegar or bicarbonate of soda regularly, or opt for a leave-in water steriliser, but do note that these do not taste pleasant and can lend a funny taste to boiled pasta (trust us, we’ve tried).
Types of water tank:
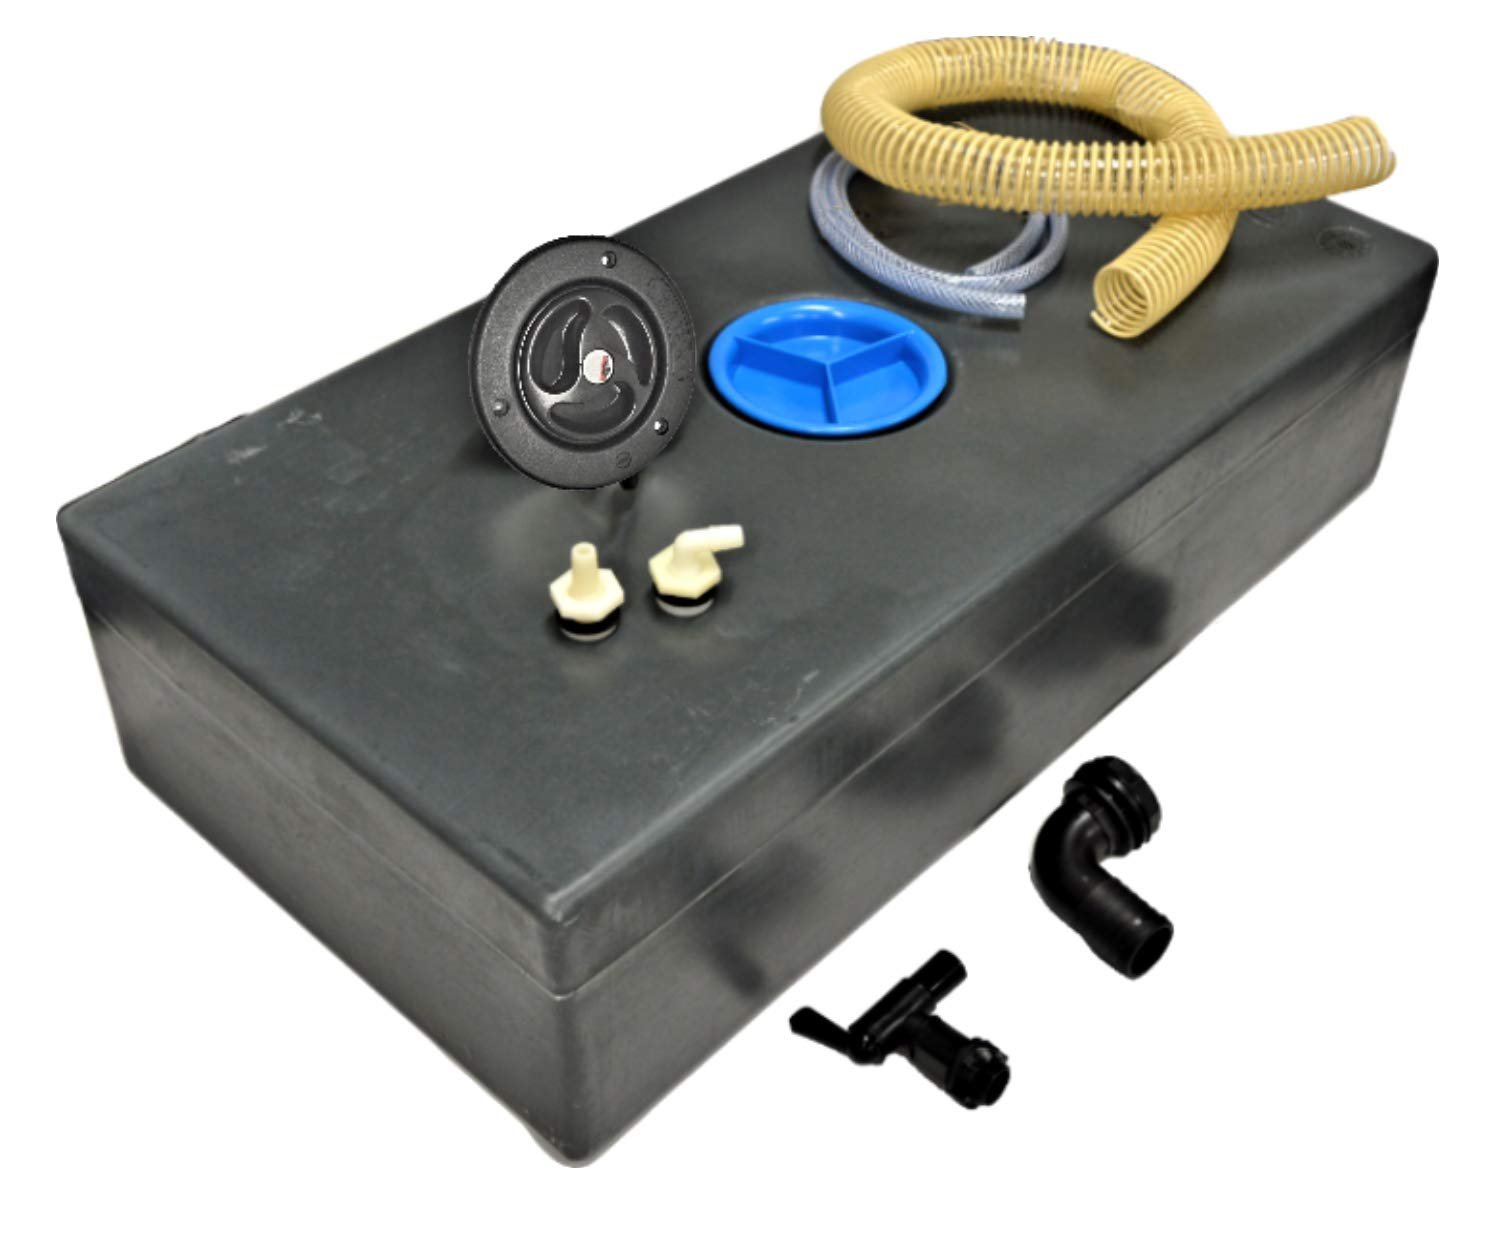
Underslung water tanks
Buy on Amazon
COST: ££
PROS:
+ Plenty of room for water storage
+ Doesn’t use space inside the van
CONS:
− The bigger the tank, the heavier the vehicle
− Much more prone to freezing in cold temps
Underslung fresh water tanks come in many shapes and sizes and can be mounted underneath or inside your van. Under van-mounted water tanks will require installation such as brackets or hangers whereas interior-mounted tanks can fit into any corners or crevices like underneath the bed or inside the kitchen cupboards. You can even buy wheel arch shaped water tanks to really save on space. These will require a water tank filler nozzle to be fitted to the van’s exterior to allow water to be pumped in, which can mean your options for filling these style of tanks may be limited to motorhome service stations, or a hose jerry-rigged to a public tap.
Basic water tanks

Buy on Amazon
COST: £
PROS:
+ Cheap
+ Easy to install or store
+ Simple to clean
CONS:
– Not necessarily free of harmful chemicals
– More prone to leaking / spilling
– Limited water storage
Basic water tanks come in a range of sizes and materials, which makes them a flexible option for placement anywhere inside your van. Common water tank fitting areas are inside the kitchen cabinets, under the sink or underneath the bed.
Portable water tanks can be a great option not only for a low budget van conversion but also for an instant water source with no installation required. They can be removed from the van for refilling, can be easily cleaned and usually have a tap or spigot to dispense water. The only downside is they do hold significantly less water than an under-van water tank.
Stainless steel water dispensers

Buy on Amazon
COST: £ - £££
PROS:
+ Stays cleaner than plastic
+. Doesn’t taint the taste
+ If using a filter, can kill 99.9% contaminants
CONS:
– Bulkier
– Can be very expensive
Stainless steel water dispensers can be a great alternative option for those who don’t like the taste plastic gives to water, and dispensers like the Berkey gravity-fed water filter can be a total game-changer for vanlife, filtering out 99.99% of contaminants using carbon or fluoride filters meaning you don’t have to worry about accidentally filling up from contaminated water.
Speaking of water purifiers, Lifesaver’s jerry cans do exactly what they say on the tin, combining water storage with a carbon filter and manual pump that filters 99.99% of bacteria, viruses, cysts, parasites and fungi from any water source. We’ve personally used these and will be taking ours on long adventures to countries with questionable water quality.
Grey water tanks
Grey water tanks are generally not made of food-safe material as they are designed to hold waste water from your camper van’s sink or shower. These are generally mounted outside the van for ease of emptying when full, but a portable waste water tank is a versatile and easily stowable option that’s great for part-timers and those who spend a lot of time on campgrounds with dump stations.
How to clean camper van water tanks:

Is it safe to drink from a motorhome tank?
The answer is generally no, not straight from the tank. Bacteria and viruses such as legionella and E-coli can thrive in dark, damp environments, particularly if your campervan has been stored for a period of time. It’s safer to drink bottled water, or to purchase small refillable tanks (see above) that are easier to wash. That said it is safe to drink from your motorhome’s tank if it’s cleaned and sterilised regularly and you run it through an inline water filter or water filter jug before consuming.
How often should you clean your camper van’s water tank?
That really depends on how often you use it. The more often water is running through your system the less time bacteria has to grow. On average 1-2 times a year, plus before and after storing the van for any period of time, would be a safe benchmark to aim for.
Wondering how to clean your camper van’s water tank and sterilise the water system?
Fill the water tank completely with fresh water and your chosen water tank cleaning product
Run all taps for 10-15 seconds to allow the cleaning product to permeate into the pipes
Leave for a minimum of 2-3 hours, or a maximum of 24 hours
Turn on tap(s) and allow the water to fill up your grey water tank to sterilise this too
Once empty fill up the holding tank again with fresh water and empty until the cleaning solution is completely flushed out
Always dispose of chemicals correctly.
Water device accessories:
Water tank level sensor

Buy on Amazon
A water tank level sensor is essential for keeping an eye on your water level for underslung tanks. The two main types are float sensors and tank probes.
Float sensors are largely mechanical and measure the level of the water via a float on a rod, the level of which is transmitted to a mechanical gauge by 12V.
Tank probes are screwed in at regular intervals up the inside of your water tank; when the water touches a probe it will illuminate a light on your water tank sensor monitor, giving you a reading out of four levels from empty to full. The sensor monitor can also be connected to up to 3 tanks giving you readings for your fresh, grey and black water systems.
Some water tank level monitors can also be remotely monitored via an app.
Instructions for fitting a campervan water tank level sensor can be found below.
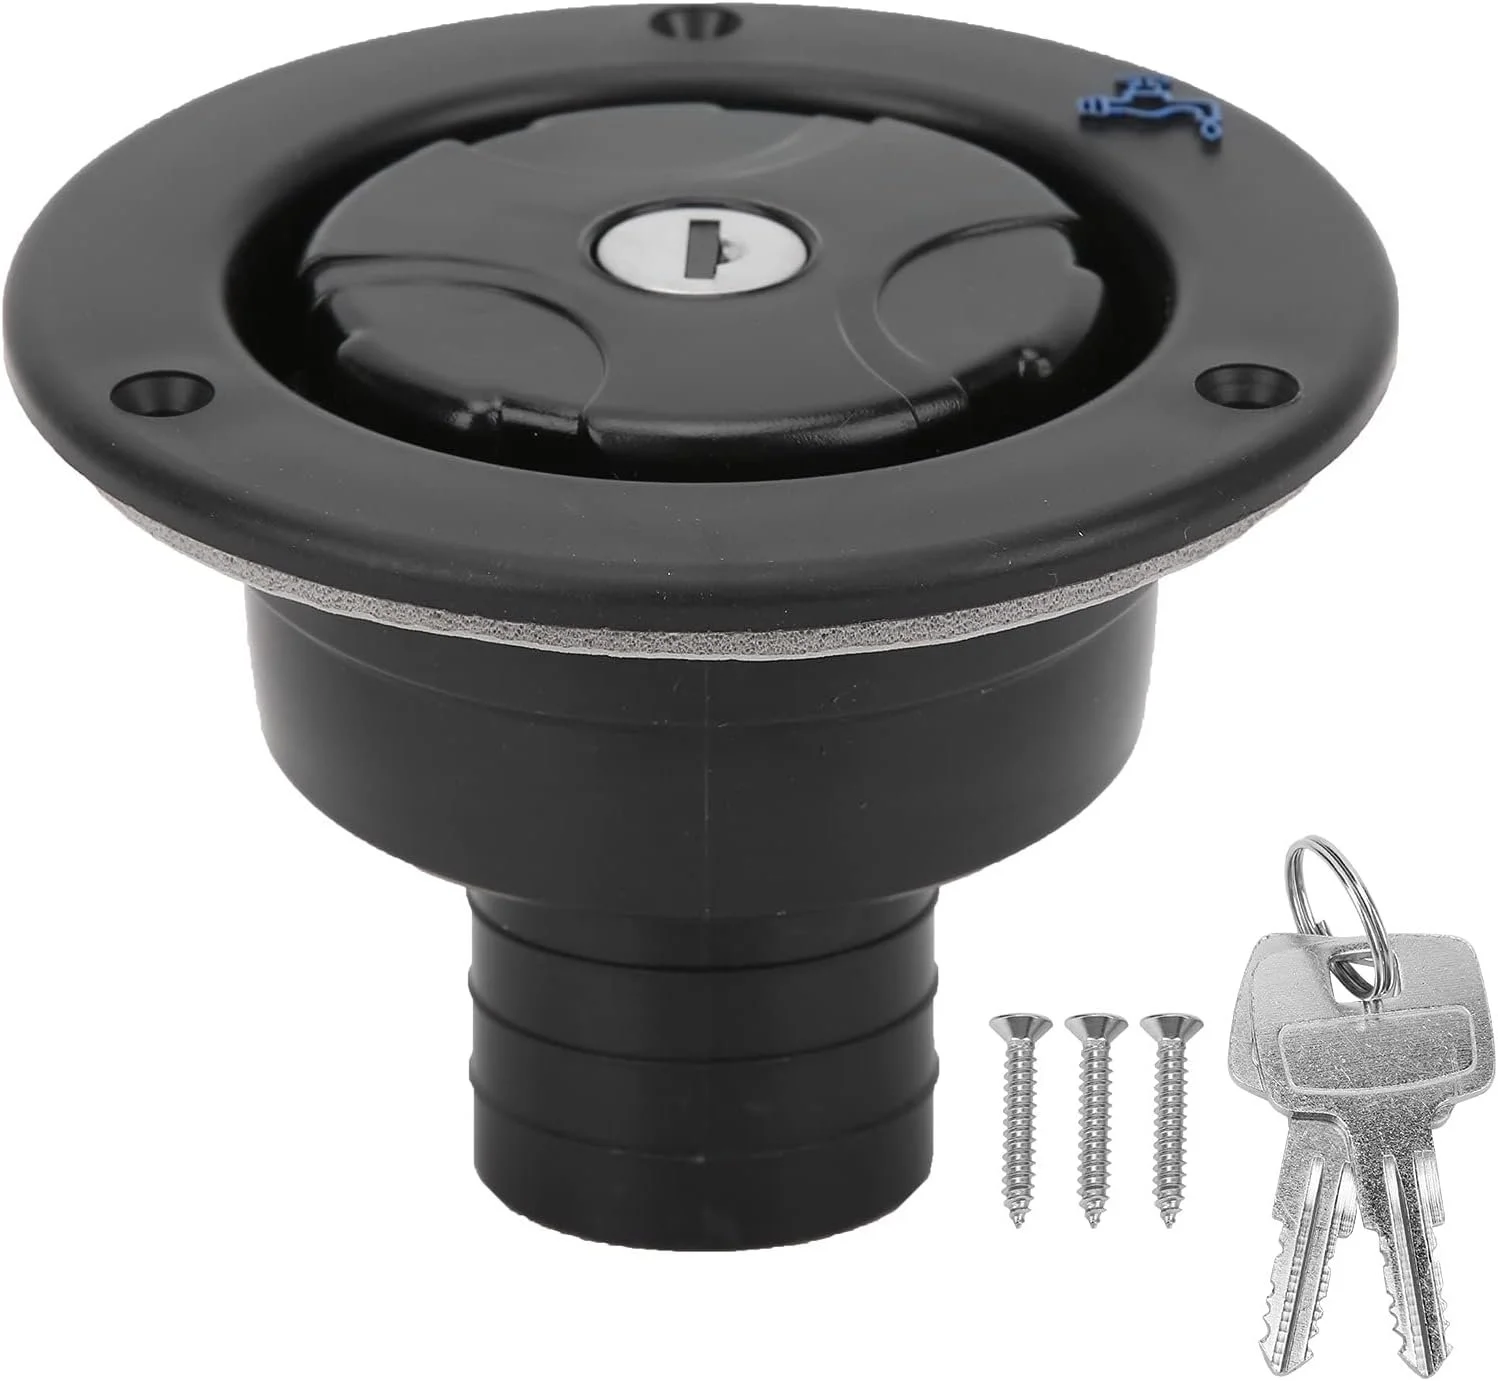
Water tank filler inlet
Buy on Amazon
A water tank filler inlet is essential for filling up underslung tanks, whether it features a hose connector for fast pressurised filling or a lockable inlet filler cap to prevent anyone from contaminating (or stealing from) your water supply.

Buy on Amazon
An electric heating element or water tank heating pad is worth installing if you plan to be heading to cold climates or doing a ski season in your van as it will prevent your tank from freezing and causing damage to your plumbing.
Tank hangers may be essential if your underslung water tank did not come with pre-sized hanging brackets.
If your water tank doesn’t come pre-fitted with connectors you may need to fit them yourself. For this you’ll need correctly sized bulkhead tank connectors. We’ll cover how to install these in the guide below.

P L U M B I N G
Toilets
To pee or not to pee? That is the question. And in the words of Morgan Freeman, everybody poops. It’s what you do with it in a van that matters.
Do you need a full bathroom set-up in your campervan with a shower and toilet, or can you make do with a portable campervan toilet?
Or even no toilet at all? And if you do opt to include a toilet in your van conversion, what type should you go for?
There are many different camper van toilet solutions, some more elegant than others, and we’re here to talk you through the details of each.
If you’re opting to have a loo with a view, make sure you can stow it away somewhere out of sight.
Below we’ll discuss:
Toilet or no toilet?
Shovels, wee cups and bag toilets
Compost toilets
Cassette toilets
Gravity flush toilets
Incinerator toilets
Macerator toilets
How to clean a camper van toilet
Camper van toilet accessories
Planning:
During the build stages of your van conversion project you may have many questions about camper van toilet ideas.
How does a camper van toilet work?
Do you need a toilet in a camper van?
How to clean a camper van toilet?
How to install toilet in camper van?
How do you go to the toilet in a camper van?
What is the best toilet for a camper van?
What is a chemical toilet for camping?
Here’s some arguments for and against having a toilet in your camper van:
Pros:
+ Convenience: Go wherever and whenever you need to
+ Privacy: Doing your business in nature or public toilets isn’t as pleasant as being in your own space
+ Comfort: A man’s toilet is his throne, and squatting hurts your calves
Cons:
– Bad smells: This could be a deal-breaker for you and your travel partner
– Emptying: Having to handle your own waste could be too much for some
– Space: Whether it’s in a bench seat or a bathroom, a toilet takes up precious living space

The no toilet option:
If you’re wondering: do I need a campervan toilet all all? The answer to that question is entirely personal to you.
When nature calls the answer must come pretty soon. But your style of vanlife can dictate whether you need to fit a toilet in your van conversion or not.
If you’re a part-timer, spend a lot of time in urban areas with nearby toilet access such as a workplace or gym, or usually opt for campgrounds with facilities, you may not need your own personal toilet.
If you’re a full-timer, like spending time off-grid and enjoy your home comforts, fitting a toilet is probably a must.
If you’ve decided you’d like a toilet, then fortunately there are many portable toilet solutions available for camper vans to suit your needs.
Shovel:

Nature poos are amazing, honestly. There’s no lower impact way to relieve yourself which involves neither chemicals nor an overloaded sewerage system. But there’s a right way and a wrong way to go about a wild poo.
Firstly: the wrong way:
Beaches, car parks and public places are not toilets. You have no business doing your business in any of these places, and piles of faeces and soiled toilet roll floating in the breeze are a surefire way to ensure camper vans are permanently banned from overnight stays there. Plus it’s a health hazard, not to mention disrespectful, so when staying overnight somewhere it’s simple: don’t take the piss. Get it?
Now, the right way:
- Choose a spot with soft ground that is at least 60m from any water sources or footpaths, and dig a hole that is roughly 15-20cm deep, or the depth of your shovel
- Do your thing, use natural or unscented toilet roll (or leaves) and bury this too, covered with a good layer of dirt and some rocks or twigs too to reduce the likelihood of animals digging it up afterward.
- Many localities encourage people to take their own paper with them and dispose of it in a bin, which can be done easily by carrying a ziplock bag. Paper can also be burnt into ash before being buried, but always be aware of fire risks.
- Never leave wet wipes or sanitary products behind as these do not biodegrade.
Nature calls aside, carrying a portable shovel in your van is always a good idea, whether it’s for digging holes in the ground or bailing out snow or mud if your van gets stuck. Keep one in your van at all times, and remember the fundamental principle of camping: Leave no trace.
Pee cup
This one’s mostly for the ladies. While peeing is a frustratingly simple task for men, who can go outdoors virtually anywhere without anyone blinking an eye, it’s a different story for women. Suppose you need to get up in the night and relieve yourself, but you can’t or don’t want to go outdoors?
Ditch the Shewee, grab one of these microwaveable soup cups, and thank me later. These have a nice wide opening, easy-to-grip handle and a watertight lid, and can hold between 2 and 3 wees at a time. Obviously no one signs up for living in a van so they can piss in a cup, but it’s nice to know the option’s there if you need it.
For men and women there’s also a portable urinal, many of which fold down for ease of transport, and some of which even glow in the dark.
As a side note, nature weeing is perfectly natural and acceptable, and, providing you dispose of toilet roll in a bin and don’t wee close to water sources, causes little to no environmental damage.


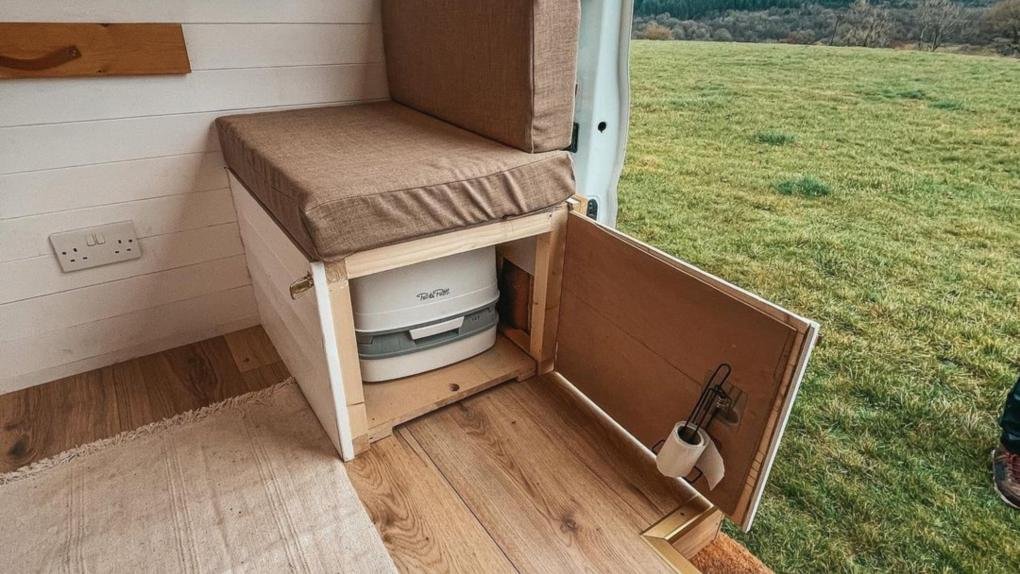
Bag toilets
A simple camping toilet is all you really need for a basic set-up along with some compostable bin bags with an opening large enough for your toilet opening (we find 20L works well). These are ideal for a small camper van toilet.
A foldable toilet is a great option for part-timers, weekend warriors, emergency use or those with limited space in their vans. These work by unfolding the legs or body, fitting a bag and then folding away again for transport. They are portable and inexpensive, however the main downside between a foldable toilet and a permanent bag toilet is that they don’t offer a place to store used bags in transit.
Bucket toilets however work exactly the same, but bags can be stored in the base of the toilet for transport. In our opinion these are one of the best portable toilets for a campervan due to their flexibility for off-grid living, although you do have to get quite hands-on with your own waste which may not be to everyone’s taste.
Remember to dispose of your bags within 3 days of using though, or they’ll start to biodegrade inside your loo…


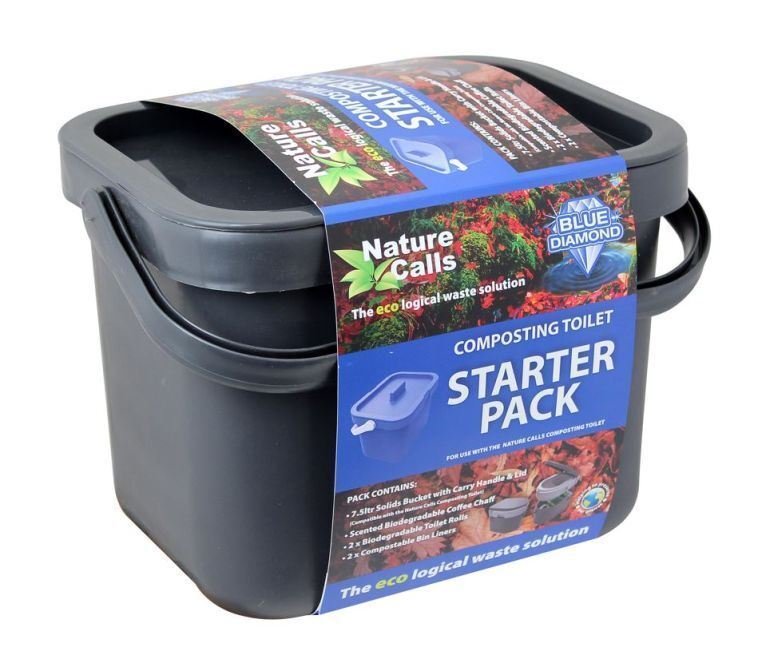
Compost toilets
A composting camper van toilet strikes that balance between comfort and eco-consciousness perfectly. They are designed to separate urine from faeces, which is bulked out with natural matter such as sawdust or coconut coir to mitigate smell and help with decomposition, and organic matter can be buried, binned or emptied onto a compost heap. You could buy a composting toilet pod, you could DIY one yourself, or you could purchase this composting toilet from Nature’s Head, if you enjoy wasting money.

Cassette toilets
Casette toilets are the typical kind of camping loo you might’ve used while holidaying in a caravan, and as such are typically simple to use. Camper van cassette toilets are generally installed permanently in your vehicle, and feature a removable waste tank which you need to pull out and empty when it’s full. This is handy if you plan to stay on campsites, or travel through areas that are well-equipped for motorhomes and feature dump stations, like France and Germany, but they’re not particularly ideal for off-grid camping, least of all because of the use of chemicals. These keep your toilet clean and free from smells, but they have a higher impact on the environment, as certain cleaners are designed to break down organic matter, which means the contents of your toilet must be disposed of in a designated dump station and not down a public toilet or- worse still- in the ground. Alternatively you can substitute these chemicals for a cup of white vinegar or some sawdust and empty more regularly.
The Thetford Porta Potti is the most popular cassette toilet, but Dometic also offer one too.


Gravity flush
Aside from chemical toilets, campervan toilets that connect to an externally mounted waste storage tank or black water tank are one of the most popular options for vanlife. Typically fitted to larger motorhomes that spend a lot of time on campsites but equally suited to long periods of off-grid living, this method allows a large volume of waste to be stored beneath the vehicle which can be emptied at dump stations with minimal contact with your own waste. This tank is usually fed by a gravity flush toilet which are often made of china and provide virtually the same experience as a toilet at home, flushing the waste away with water or chemicals into an external holding tank. The key difference between a camper van toilet and household one is that the camper van toilet will be fed from a water tank or chemical supply to provide the flush.


Macerating toilet
Macerating toilets work just the same as gravity flush toilets, but they have a 12V power supply which activates a macerator each time the toilet is flushed, liquidising the waste on its way down for easier storage and emptying. A campervan macerating toilet works by activating a set of metal blades each time the toilet is flushed which liquify the solids, making them easier to store and allowing them to decompose quicker. While not essential in a van and more commonly used in boats, it could be an asset to those looking to extend their time off-grid with additional black water tank storage. These toilets run on a 12V supply which comes pre-installed so all you need to do is wire it and the on/off switch to your van’s power supply.

Incinerator toilet

An incineration toilet is a relatively new concept in the vanlife industry. Despite Cinderella having been around for over 25 years, they only created their first travel toilet in 2013- and it’s taken a while to catch on. This is an innovative and truly eco-friendly waste solution with no caveats; the toilet runs on an LPG canister with 12V ignition, incinerating waste at high temperatures to leave only a small amount of sterile ash. The toilet can be used up to 70 times before the ash pan needs to be emptied, and provides a waterless, storage-less solution for traditional campervan toilets.
It can be retrofitted into any existing campervan or installed anew, however an exhaust pipe must be installed to vent the gases created (no toilet pun intended). The downside? Its prohibitively expensive price point, with estimates starting at around £4,000 per unit.
How to clean a campervan toilet:
Cleaning and emptying a campervan toilet is a little more hands-on than a domestic toilet, but that’s the price we pay for freedom.
Firstly empty the campervan toilet cassette, or dispose of bags or composted waste
Next rinse out the cassette or any areas waste may have touched directly using water
Pour toilet cleaner into the bowl and scrub with a toilet brush or sponge, allow to sit for 15 minutes before rinsing off. For an eco-friendly alternative, spray with a warm water and vinegar solution (you can add lemon juice to mask the odour), or consider using an eco-friendly cleaner. Never empty these chemicals into the great outdoors.
If rinsing isn’t possible, spray the entire toilet surface with anti-bac and wipe off with kitchen roll. We recommend eco-friendly cleaning tablets for ease of storage and a lower environmental impact
Toilet accessories:
Here’s a couple of accessories that will make your vanlife toilet experience all the more comfortable and practical.
A toilet tent allows you to create a private outdoor bathroom where smells can vent freely- your travel partner will thank you.
The SOG® system is an electrical ventilation system that can be fitted to most styles of camper van toilet, sucking odours outdoors and allowing fresh air in which helps waste to break down quicker. This keeps your camper van toilet working efficiently with no bad smells and no need for harmful chemicals. For it to work a vent pipe and fan must be fitted to the van, but SOG provide three different systems that can be installed on either the floor, door or roof for a flexible install for any camper or toilet type.

P L U M B I N G
Showers & hot water
When you’re getting started with vanlife you might be worrying about how to shower in a campervan, or maybe you’re wondering if you need a shower in your campervan at all. It can be a difficult transition from a house with unlimited hot water to a van with a limited water supply, but thankfully there are tons of camper van shower ideas out there. Let’s take a look at them.

The shower in our Bedford CF campervan.
In this section we’ll explore:
Water heating options
Shower types
Shower types:
No shower
Believe it or not you might not actually need a campervan shower at all. Van living is a big adjustment but your daily routines will change and adapt to your new way of life and you may find you don’t miss having daily showers. We ourselves no longer have a shower in our van and we don’t miss it, although we do bathe in hot springs regularly which helps…
Many vanlifers who don’t have showers do in fact have gym memberships where they can shower after a workout, or friends and family who they can drop in on. Truck stops across the UK and Europe usually provide showers for as little as €1 and can be found using apps like Truck Parking Europe.
Many motorway service stations also offer shower facilities which can be cleaner and more modern than truck stops. Check out VINCI’s map of service station showers across France, shower.me for Spain or autostrade.it for Italy.
Apps like Park4Night (premium) and iOverlander also provide information on campsites with showers available. Sometimes it’s more viable to book an AirBnB or hostel to use the shower and washing machine in one go. Some beaches even have free cold showers.
Finally, although it’s a cliché and you may squirm at the thought, lakes and rivers are a free natural way of bathing, even if it’s just for a splash wash with some eco-friendly soap. And there’s always a good flannel wash with hot water or biodegradable wet wipes for in-between days.
Basic shower
If the thought of not having a campervan shower makes you squirm then a basic campervan shower system could be all you need to get started with van living. All of these options are economical on water and budget-friendly.
A solar bag shower is the most basic campervan shower option. It works by filling the bag with water and placing it out in the sun to heat up before dispensing through a shower hose. The downside is the heat is inconsistent, the bags are generally poor quality, and the system only really works in hot sunny climates like Spain where you probably don’t actually want a hot shower.

A 12v campervan shower is one of the simplest and most portable options there is. Simply fill a container (a collapsible bucket or kettle works well) with warm water, dunk the pump end in and switch the shower on. These showers have rechargeable batteries but also connect directly to 12V.

A portable pressure camp shower like the Nemo Helio is a low-tech alternative to a 12V shower, which works by filling the portable canister with water, sealing it then inflating it with air via foot pump. The canister can be left out in the sun to heat up or filled with pre-heated water, then the air pressure pushes the water out via a detachable shower hose.

The Kampa Geyser portable hot water system, although not as portable as the other options, is an innovative device that gives on-demand hot water anywhere. Connected to a gas bottle and a 12V supply a submersible pump is dropped into a water supply and the system then heats the water to 25ºC above ambient temperature and dispenses it at a flow rate of 2.5L/min. The water can also be passed through the system multiple times to heat it to the desired temperature.

Plumbed-in shower
Many larger vans have space for a full campervan shower and toilet cubicle to be built-in, and we’ll be covering how to build and install a shower in a van in the section below. Here are some of the best shower options which will also allow you to have a full campervan hot water system installed in your build.
Tankless propane gas water heaters
Tankless propane gas water heaters are the go-to for many van conversions due to their simplicity and relatively low price point. They work by drawing cold water into the unit using an external pump. A small flame is ignited, fuelled by an LPG bottle, which in turn warms up a heat exchanger inside. As cold water passes over this heat exchanger it is instantly heated and then dispensed at the correct temperature. Pay attention to the minimum water pressure start-up figure, as these heaters will not operate if the water pressure is too low.
Brands such as Camplux and Cointra (which we have installed in our Bedford) offer on-demand hot water powered by LPG and a D battery that is very economical on gas consumption. These can also be teed off to the kitchen to create a full camper van hot water system.


It’s important to be aware that there are two types of tankless water heaters: those which have an externally vented flue are suitable for indoor use, whereas those without a flue are only suitable for outdoor use. Brands such as Ecotemp fall into the latter category and as such are only safe to be used outdoors, but many vanlifers get around this by attaching their boiler to the back doors of their van where they can shower with plenty of ventilation for the exhaust.
Safety: Carbon monoxide is a poisonous, flammable gas that is colourless, odourless, tasteless and can cause acute illness or death when inhaled. LPG boilers should be installed and signed off by a Gas Safe engineer, and should be fitted to a piece of fire-resistant cement board to meet safety regulations. A carbon monoxide detector should always be fitted where gas is present, and to pass Gas Safety Certificate regulations should be both BS EN 50291-1 and BS EN 50291-2 compliant. For hire vans the Gas Safe engineer should be LAV (Leisure Accommodation Vehicle) qualified. A guide to Gas Safety regulations for LAVs can be found here.
Electric tankless heaters
Electric tankless water heaters could be a good option for those looking to steer clear of fossil fuels and who have large battery banks and solar set-ups. These work by using electric to heat up an element over which cold water passes, creating instant on-demand hot water. The downside would be their large power consumption often ranging from 3000W - 8500W as they are primarily designed for domestic use.

Electric tank heaters
Electric tank water heaters are generally more economical to run than tankless ones, using a heating element to heat water inside a small holding tank. The Bosch electric mini-tank water heater is fairly economical, consuming just 1400W to heat up its 25L tank. A better option for van builds could be the Truma Therme TT2 , which heats water from 15°C - 60°C in its 5L tank, consuming just 300W of power.


Deisel water heaters
Diesel water heaters (or less commonly petrol water heaters) are an efficient and economical way to heat water in your camper van. They can heat air, water or both simultaneously, drawing on fuel from your van’s tank or its own unique fuel source. They work by pumping fuel into the unit which is mixed with air via an intake to create combustion, which in turn creates heat. This then warms up the internal heat exchanger over which liquid is passed to heat it; this liquid runs through a coil which circulates between the heater and an external water holding tank.
Installation is simple requiring only some basic wiring and plumbing, and an external exhaust will need to be fitted to vent fumes, usually beneath the van.
Heaters such as the Eberspächer hydronic or the Webasto Thermo Top Eco range offer both hot air and water, running on 12V and consuming between 0.1L and 0.3L of fuel an hour.


Calorifier
Calorifiers are a great option for creating hot water in your camper van as they use waste heat from your engine so they require no additional resources. Most commonly used on boats but also overlanders, they work by connecting to your engine’s coolant recirculation system, where the heated coolant will circulate between the engine and the coils inside the calorifier’s insulated tank to heat the water around them. The only downside is they are a little bulky to store, but the upside is you’ll have instant hot water as soon as you park up after a day of driving. If you’re planning on spending long periods in one spot this may not be such a good option as you’ll need to run the engine each time you want hot water.

Buy on eBay

P L U M B I N G
Sinks & shower trays
Choosing a campervan sink is both a practical and aesthetic decision as it will become one of the focal points of your van. While campervan shower tray options are more limited, there's still room to get creative with your van bathroom.

A ceramic Moroccan sink in our Bedford camper.
Sinks:
The size and style of your sink will largely depend on available space in your van’s kitchen. If you are converting something small you’ll probably only have space for a galley-style kitchen with a small sink or an integrated sink and hob unit, however if you’re converting a bus or an overlander you’ll likely have more space to dedicate to your kitchen and you could even be looking at a domestic size or double sink.
Your sink doesn’t even have to be a sink, as many vanlifers choose to DIY their own out of jam pans, buckets or enamel mixing bowls. The choices are endless!
You may be wondering: do you need a sink in a campervan? The answer is generally yes as it will make daily chores a lot easier, however in a basic campervan conversion you could get away with using just a collapsible washing up bowl. If you choose not to have a grey water tank on board, just remember to be conscious to the environment you’re living in and always dispose of waste water consciously.
Here’s a guide to the best campervan sink ideas:
Stainless steel sink
A stainless steel sink is a hard-wearing budget-friendly option that is used in most motorhomes and is also popular with van conversions. They’re lightweight, easy to clean and maintain and simple to install. The only downside? They’re not the most aesthetically pleasing. If you’re looking for something a little different, we recommend the Houzer porcelain enamel steel sink to add a pop of colour to your van kitchen.

Double bowl sink
A double bowl sink could be a good fit for those in larger vans, truck campers or overlanders, giving the full functionality of a domestic-size kitchen to your vehicle. The Lippert double sink is designed with campers in mind and as such is narrower and made of hard-wearing ABS plastic.

Integrated sink
An integrated sink and hob is ideal for space-saving with a smaller footprint and a lid that transforms into additional worktop space when not in use. Dometic are the go-to for integrated sink and hobs for campervans, offering sleek designs with stylish black glass lids.

Ceramic sink
A Moroccan ceramic sink is a stylish but impractical option. They aren’t suited to everyday use as they are prone to chipping and cracking, however they do add a unique sense of style to a van build, so there’s a lot of pros and cons to weigh up. We have one of these in our Bedford build which after one year only has a minor chip in the rim.

Bathroom sink
Bathroom sinks for campervans are generally very small, made of plastic or stainless steel and either bowl-shaped or designed to fit into a corner. You can even get folding campervan sinks with taps.
Shower trays:
Unlike sinks there aren’t many camper van shower tray ideas out there. Having such a small space that needs to be watertight means there are only limited options to create a full campervan bathroom.
Acrylic shower tray
An acrylic shower tray designed for van conversions is just a smaller version of what you’d find in a house, usually measuring around 584mm, although they do come in a range of custom sizes and angles depending on your needs.
Integrated shower tray
If you’re looking to create a campervan shower and toilet unit then a plastic shower tray with integrated toilet or one with with space for a toilet will make installation even easier.

DIY shower tray
There’s always the option to DIY a campervan wet room too, which we did in our Bedford build with buffalo board, a tanking kit and tiles. You can watch the video on how we built our van shower here.
P L U M B I N G
Pumps
In order to have a full working campervan water system you will need a pump to draw water from your storage tanks to your taps.
So how does a water pump work in a campervan?
A 12V water pump works by creating pressure in the pipes which it then monitors; when it senses a drop in pressure it will automatically repressurise the system, which is why a leaky pipe or tap will mean your pump is running constantly. Manual pumps are far simpler and rely on human power to draw water up from the source to the outlet.
We’ll cover how to install a campervan water pump in the installation guide below.
Manual pumps
A manual water pump is a simple, cost-effective method of drawing water from your tank to your tap. In this setup tanks are usually stored underneath the sink and a foot or hand pump is installed close by to allow for ease of pumping. This system does not usually allow for flowing hot water.
Foot water pumps are a popular choice as they leave your hands free for washing up while controlling the flow of water. Whale is the most common brand of foot pump. The Whale compact can deliver up to 8.3L /min, while the Whale Gusher can deliver up to 16L /min; both have 13mm hose connections.
Hand water pumps offer an integrated tap and water pump system that operates manually by pulling a lever. The Whale Flipper Pantry flows at 7L /min and has a swivel tap and 13mm hose connections.
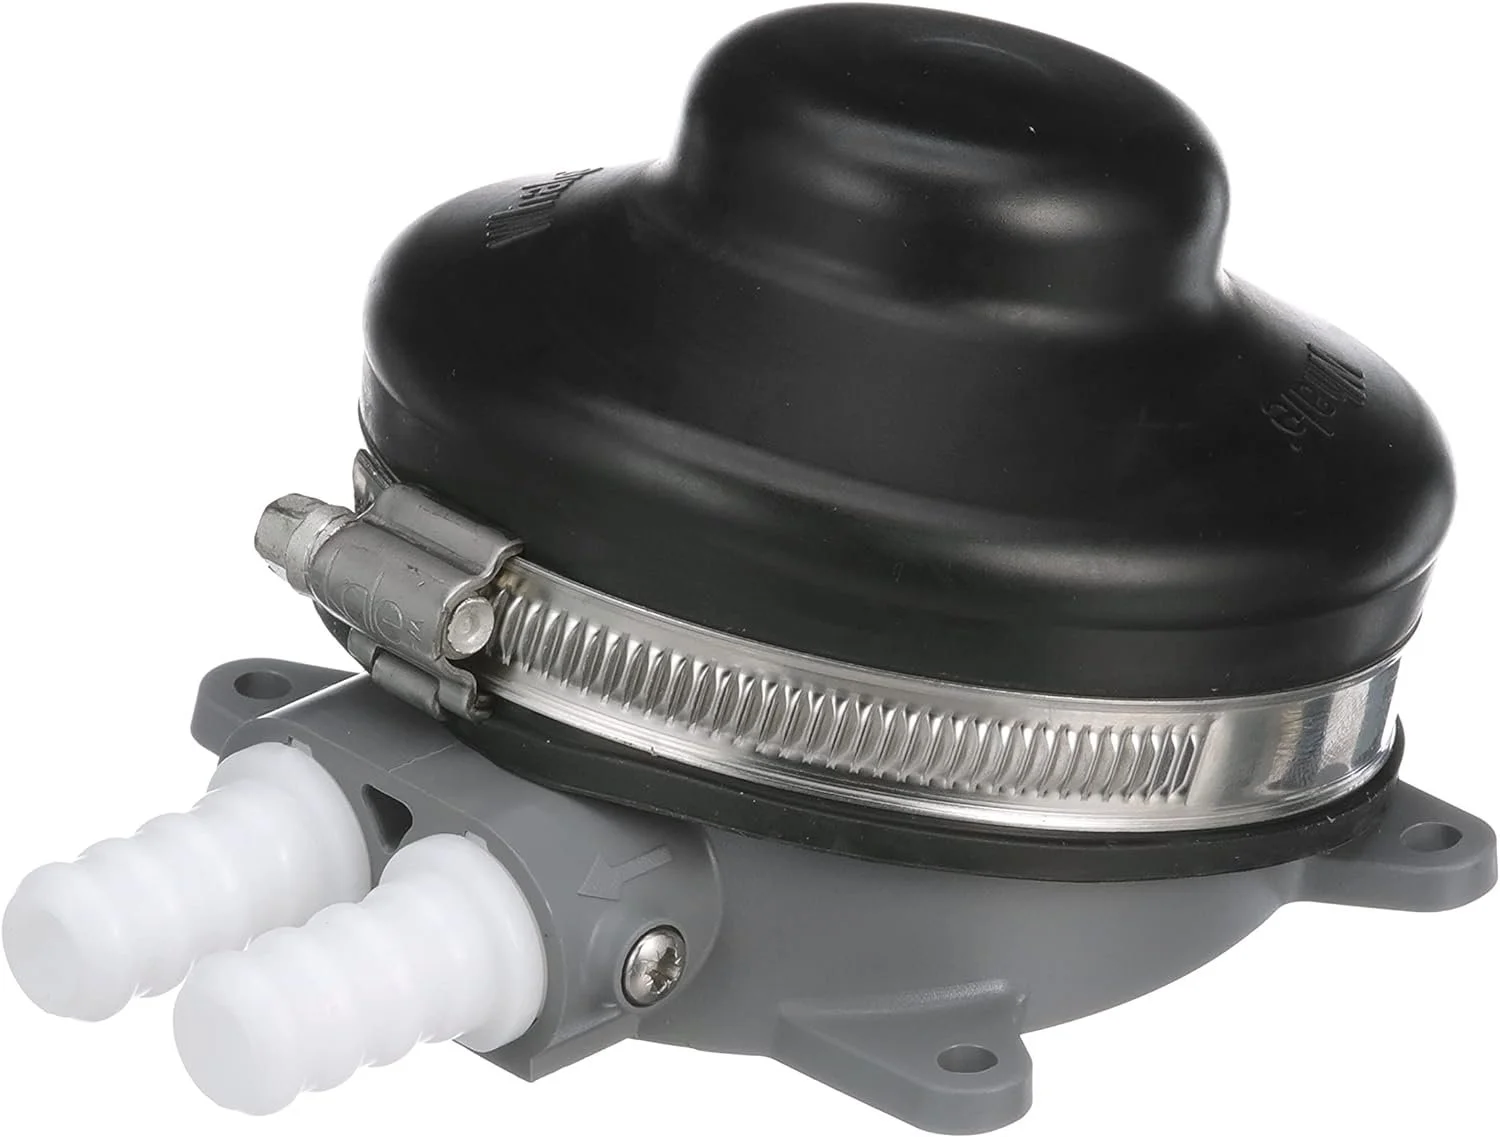


Submersible pumps
Submersible water pumps sit inside your van’s water tank which means they must be fitted during the build stage. They are generally used to pump from a cold water tank to a tap or boiler. Specialist submersible pumps are available for submersion in hot water tanks.
The Whale submersible electric pump is a good quality option that runs on 12V and can pump up to 10L /min.

Diaphragm pumps
A diaphragm pump is one of the most popular options for a camper van water pump as it most closely mimics a household water supply. The diaphragm pump keeps the water system pressurised at all times, working to repressurise when it senses a drop in pressure i.e. when a tap is opened. These are particularly great for campervan shower plumbing as they create water pressure levels similar to a household. The downside is if there’s a leak in your system, or the tank runs empty, the pump will run continually as it tries to repressurise, so it would be advisable to wire it to a switch or fuse that can be disconnected.
It’s also advisable to fit this type of pump to a solid surface that won’t vibrate with rubber washers to minimise vibration noise as it runs.
There are many brands of 12V diaphragm water pump available of varying price and quality, but we’d recommend Shurflo whose quality pumps are worth the higher price point. If your campervan’s water pump is not working, odds are it’ll be the microswitch that has failed, which is an easy replacement.
A water pump silencer hose is a great addition for dampening noise, as diaphragm pumps can be noisy when running.


Accumulators
An accumulator tank isn’t essential, but it can increase the lifespan of your pump, save battery power, and reduce noise. It attaches to a diaphragm pump and once installed is pressurised with air. This helps to smooth out the flow of water by accumulating a small amount of it like a mini tank between your actual tank and the tap, meaning your pump doesn’t need to run every time you turn the tap on just to rinse your hands.

Inline water filter
Installing an inline water filter is a great way of ensuring no nasties reach your tap from your water tank, especially if you plan to be drinking from it. It can also reduce the taste of chlorine or any cleaning product residue, as well as bacteria and sediments at the bottom of the tank. Camco TastePure is designed specifically for campervans and boats with a 20 micron activated carbon filter.Water filter cartridges should be changed every 6-12 months.
A water strainer can also be fitted directly to your pump to help prevent sediments flowing into your water system.


P L U M B I N G
Pipes & fittings
There are many different types of pipes you could use in your campervan plumbing kit, each with its advantages and disadvantages.
Types of hose and pipe:
There are many different types of pipes you could use in your campervan plumbing kit, each with its advantages and disadvantages.
PVC hose is exactly the same as your braided garden hose at home, and is cheap, lightweight and easy to work with. However it can lend a plasticky taste to drinking water, can degrade over time and should not be used for water above 50ºC.
J G Speedfit and Hep20 are both push-fit plumbing systems that are made of lightweight plastic with easy to install leakproof joints. They can support temperatures of 65ºC - 90ºC and are suitable for both cold and hot water systems.
PEX pipe is commonly used for campervans as it is cheap, flexible and easy to work with. Many people think it’s the best campervan water pipe. It can withstand temperatures of <85ºC and comes in red and blue to differentiate between hot and cold systems, however installation can be a bit of a learning curve.
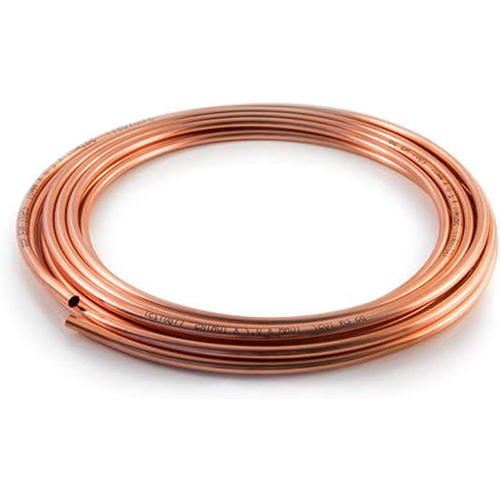
Copper pipe is heavy and expensive and as such is not recommended for campervan conversions, except in gas applications.
PVCU waste pipe is only used to take waste water from your sink and shower to your grey tank as it is not designed to withstand water pressure. A standard size for campervan waste water pipes would be 32mm.


Types of fixing and fitting:
With each type of campervan plumbing pipe there are different plumbing fittings and methods of installation.
PVC pipe is usually clamped together with jubilee clips but can also be used with barbed fittings to connect two lengths of pipe
J G Speedfit and Hep20 use their own brand push fittings which do not require tools, and are removable using the Speedfit release aid or Hep20 hepkeys
PEX pipe connects using a range of barbed fittings that the hose is crimped or clamped onto using a PEX crimping tool and crimping rings or clamping rings. To cut the hose down you’ll want to use a PEX cutting tool and PTFE tape for added sealing on brass connectors. You could also use Sharkbite fittings or compression fittings which do not require specialist tools.
Copper pipe is connected using a mixture of copper fittings which are soldered, brass compression fittings which are tightened with a spanner or Sharkbite fittings which push straight on like push fit connectors. PTFE tape can also be used to add an extra seal.
Waste pipe is fitted using a series of elbows, straight couplers, equal tees. Some of these are connected using solvent weld but some have built-in compression fittings which are tightened around the pipe. These are preferable to use for novices as solvent weld can be harmful to skin and airways.
P L U M B I N G
Installation
In order to have a full working campervan water system you will need a pump to draw water from your storage tanks to your taps.
So how does a water pump work in a campervan?
A 12V water pump works by creating pressure in the pipes which it then monitors; when it senses a drop in pressure it will automatically repressurise the system, which is why a leaky pipe or tap will mean your pump is running constantly. Manual pumps are far simpler and rely on human power to draw water up from the source to the outlet.
We’ll cover how to install a campervan water pump in the installation guide below.
Manual pumps
A manual water pump is a simple, cost-effective method of drawing water from your tank to your tap. In this setup tanks are usually stored underneath the sink and a foot or hand pump is installed close by to allow for ease of pumping. This system does not usually allow for flowing hot water.
Foot water pumps are a popular choice as they leave your hands free for washing up while controlling the flow of water. Whale is the most common brand of foot pump. The Whale compact can deliver up to 8.3L /min, while the Whale Gusher can deliver up to 16L /min; both have 13mm hose connections.
Hand water pumps offer an integrated tap and water pump system that operates manually by pulling a lever. The Whale Flipper Pantry flows at 7L /min and has a swivel tap and 13mm hose connections.
Submersible pumps
Submersible water pumps sit inside your van’s water tank which means they must be fitted during the build stage. They are generally used to pump from a cold water tank to a tap or boiler. Specialist submersible pumps are available for submersion in hot water tanks.
The Whale submersible electric pump is a good quality option that runs on 12V and can pump up to 10L /min.
Diaphragm pumps
A diaphragm pump is one of the most popular options for a camper van water pump as it most closely mimics a household water supply. The diaphragm pump keeps the water system pressurised at all times, working to repressurise when it senses a drop in pressure i.e. when a tap is opened. These are particularly great for campervan shower plumbing as they create water pressure levels similar to a household. The downside is if there’s a leak in your system, or the tank runs empty, the pump will run continually as it tries to repressurise, so it would be advisable to wire it to a switch or fuse that can be disconnected.
It’s also advisable to fit this type of pump to a solid surface that won’t vibrate with rubber washers to minimise vibration noise as it runs.
There are many brands of 12V diaphragm water pump available of varying price and quality, but we’d recommend Shurflo whose quality pumps are worth the higher price point. If your campervan’s water pump is not working, odds are it’ll be the microswitch that has failed, which is an easy replacement.
A water pump silencer hose is a great addition for dampening noise, as diaphragm pumps can be noisy when running.
Accumulators
An accumulator tank isn’t essential, but it can increase the lifespan of your pump, save battery power, and reduce noise. It attaches to a diaphragm pump and once installed is pressurised with air. This helps to smooth out the flow of water by accumulating a small amount of it like a mini tank between your actual tank and the tap, meaning your pump doesn’t need to run every time you turn the tap on just to rinse your hands.
Inline water filter
Installing an inline water filter is a great way of ensuring no nasties reach your tap from your water tank, especially if you plan to be drinking from it. It can also reduce the taste of chlorine or any cleaning product residue, as well as bacteria and sediments at the bottom of the tank. Camco TastePure is designed specifically for campervans and boats with a 20 micron activated carbon filter.Water filter cartridges should be changed every 6-12 months.
A water strainer can also be fitted directly to your pump to help prevent sediments flowing into your water system.