HOW TO BUILD A CAMPER VAN:
M E C H A N I C A L
In this guide we’ll cover:
How to diagnose faults
How to find parts
Removing and greasing kingpins
Wipers
Brakes
Starter motors
Fueling
Steering
Wiring guides and diagrams
Let’s get started.

Contents

Diagnosing faults

Wipers

Fuel

Propshaft

Finding parts

Starter motors

Wiring

Kingpins

Brakes

Steering

LDV workshop manuals
Many of the products that appear below are either Amazon or eBay affiliate links. We earn a small commission on sales at no extra cost to you.

M E C H A N I C A L
Diagnosing faults
Whether you’re trying to figure out if a garage is lying to you about what needs fixing, trying to clear old fault codes or you’re tackling your engine’s problems head on, one thing is almost certain, you’ll need the right software to aid you.

Did you know a Ford OBD reader works with an LDV Convoy 2002 onwards?
Firstly, we’re going to assume you want to try and fix your LDV yourself; after all, garage bills are expensive, right? Secondly, we’re going to tell you about the one essential piece of kit that will make identifying and fixing problems much much easier.
We’re not promising any miracles, because LDVs are complicated beasts with ridiculously awful electrics, but this will help.
Lift up the rubber mat in the centre of your dashboard and prise out the ashtray, and you will find an OBD reader connector. I know, we were as surprised as you are that such a basic van actually has one of these. Now, don’t wait for your breakdown company to come out and attempt to read the faults before towing you off to a garage, get yourself one of these- a FORScan OBD2 reader, or a regular OBD reader if you don’t have a Ford engine. These things are lifesavers!

Lift up your ashtray and you’ll find an OBD port.
The OBD plugs into your van and connects to a Windows computer via USB; you then install the FORScan software and you can instantly read all of your van’s fault codes in detail. Hooray!
Unfortunately, once you have the codes it can take some Sherlock-level detective work scouring forums on the internet to find the hidden meaning that links the numerous fault codes together to give you your answer. We’ve listed some common DTC fault codes that point to various problems throughout this article, particularly in the fuel pump and wiring sections. You’ll also find the LDV Convoy and LDV Pilot wiring diagrams as well as all the LDV Convoy manuals we have accumulated over the years available to download at the bottom of this page. And no, there’s no Haynes manual for an LDV Convoy. Sorry.
As a side note, the LDV Convoy OBD reader only reads faults within the electrical system, unlike modern vehicles which can point you in the direction of most faults electronically, so diagnosing purely mechanical problems is a trial-and-error process just like in the days of old school mechanics.

M E C H A N I C A L
Finding parts for an LDV
Any LDV owner will surely know just how difficult finding replacement parts for their van can be when things break down. Unlike most normal vans which only have brand-specific parts, an LDV can be made up of just about any bits from Peugeot to Ford to Rover, causing no end of frustration to their owners.
A question we get asked quite often is: how we go about finding parts for our LDV Convoy? We thought we’d explain the various processes we go through each time we need to find a part for our van in the hope that it can help someone else.
Please note: We have an LDV Convoy with a Ford Transit 2.4L 75bhp engine. It is the 3.85T minibus model with engine code F4FA. We can only provide information about this specific type of LDV as we don’t have experience with the 2.5L banana engine or the smaller LDVs, whose parts do differ from ours as we will explain below.

Finding parts for an older vehicle can sometimes be very frustrating!
Identifying your LDV
If you don’t know what type of LDV you have then there is a really handy website that can help you.
LDV Parts Direct is a useful website where you can enter your reg number and it will bring up virtually every detail you need to know about your van. Their prices are a little steep for parts but they do provide original genuine LDV parts and have just about everything LDV-related so it is an extremely useful resource.

LDV Parts Direct is an official stockist of LDV Parts.
The most important thing to remember about an LDV is that the only LDV part of it is the bodywork. The engine and its associated parts are Ford, and once we learned to start telling foreign garages abroad that we had a Ford Transit and not an LDV things became much simpler for us (hardly anyone outside of the UK has ever heard of an LDV, so it’s best to mention a make that they actually recognise).
Your four digit engine code can be found within your engine number, such as:
LDVF4FA050964
This can be found in your logbook (V5C).
Sometimes you can make searches quicker by searching for parts including your engine code. Also if you’re particularly crafty, the most efficient way of finding parts is to take the part numbers off the parts from your vehicle (if possible) and cross-reference them with various websites online until you get a usable part number (most parts have multiple different part numbers depending on the manufacturer, so cross-referencing may be necessary). This can be handy for sites such as eBay, when larger parts dealers like Euro Car Parts and Alliance Automotive come up short.
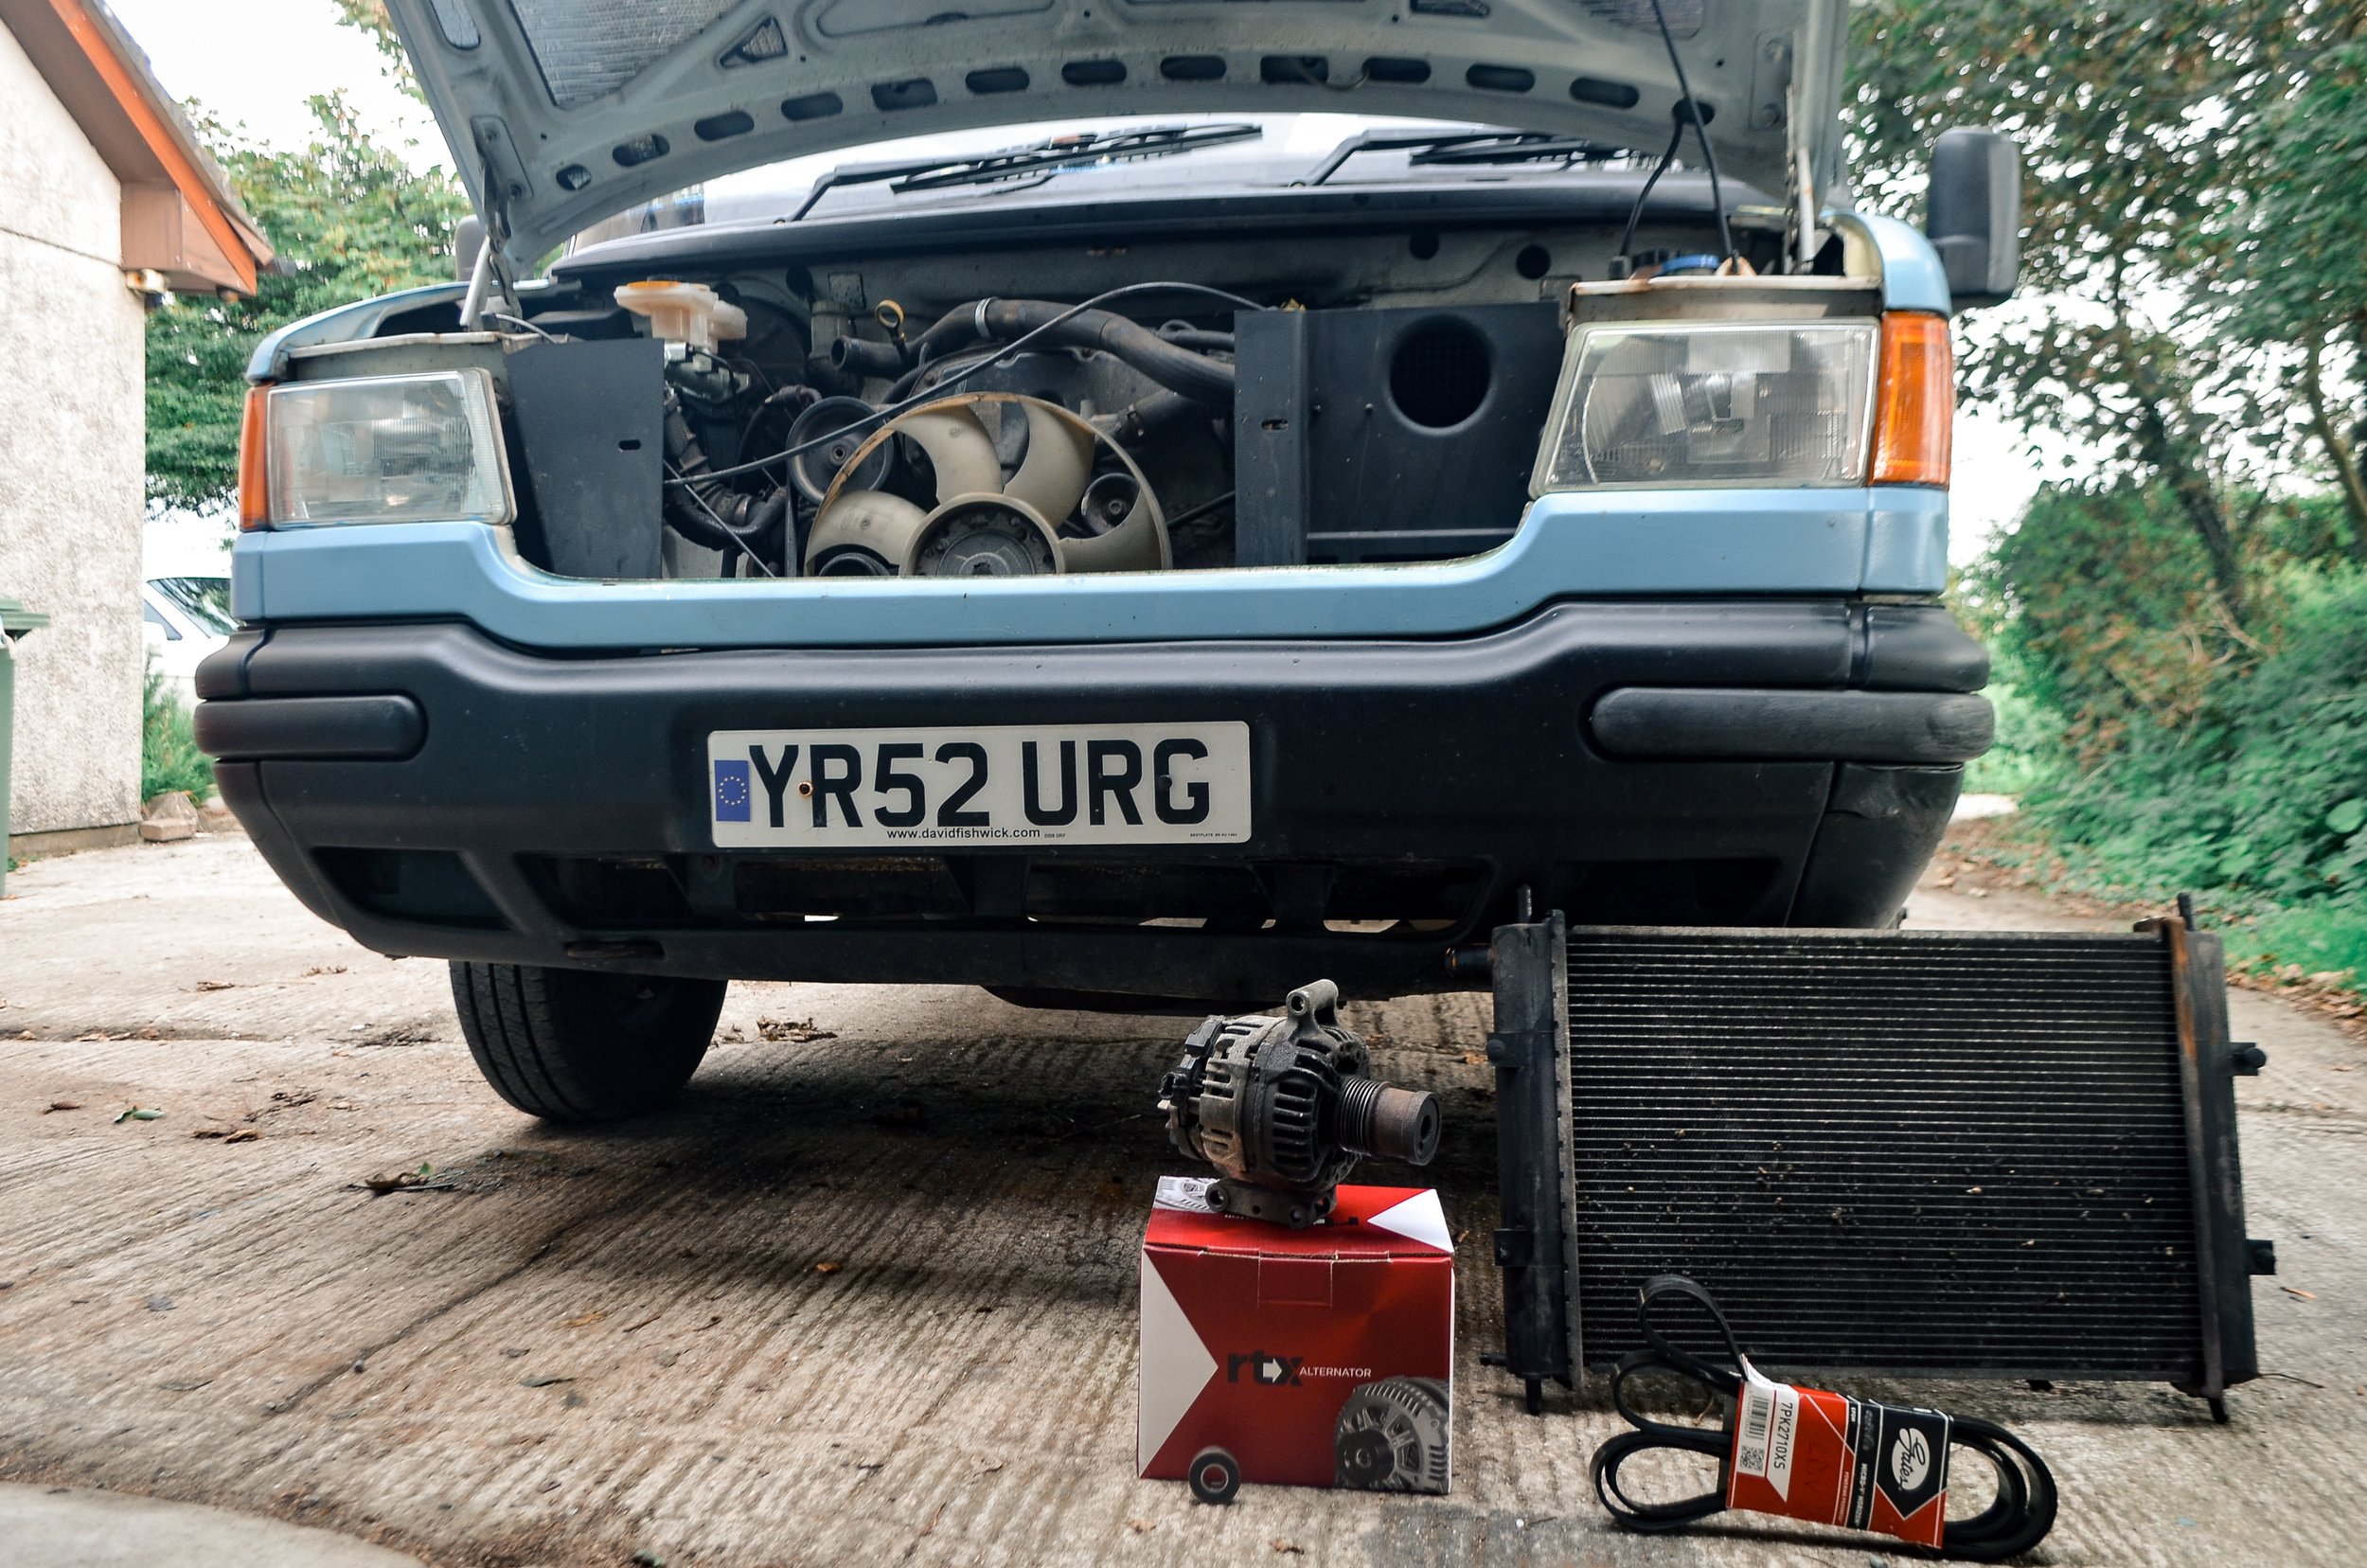
A new radiator, alternator and fan belt for our van.
Ford parts vs LDV parts
It is common knowledge that LDV Convoys were born out of a parts bin, taking bits from Fords, Peugeots, Austins, Land Rovers and even Metros to create this van that once rivalled the Transit as the backbone of Britain. This allowed the company to keep costs down, but makes it so very difficult for long suffering LDV owners to find the correct parts.
This is by no means an exhaustive list, but generally anything engine related such as timing chains, EGR valves, vacuum pumps etc are from a Ford Transit MK6. Anything brake and suspension related such as shock absorbers, brake master cylinders, brake pads, anti roll bar, drop linkages etc are LDV.
Anything electrical such as the ECU, diesel pump and immobiliser system are Ford. Anything bodywork related such as panels, windscreen, windows, doors etc are LDV.
Knowing this little trick has helped us find parts so many times, as when nothing turned up in our search results for LDV parts we simply typed in ‘Ford Transit’ instead and were able to find what we needed, most often much cheaper as well. As LDVs become rarer on the roads and Ford Transit MK6s outnumber them ten to one, sometimes this is the only way we can keep our van on the road.

Key differences
Most often the differences between a regular LDV Convoy and the minibus model are negligible; one has a higher roof than the other and usually comes with extra seats. But the main differences lie in the braking system, as we found out through an extensive phase of trial and error.
The LDV minibus version (the 3.85T one with a high top roof) has bigger brakes than regular LDVs. This means that the master cylinder is different, with a larger internal bore diameter to push out more brake fluid, and the brake pads are bigger too. With several kinds of master cylinder to choose from, this is really important to know!
Also there are virtually no similarities between the 2.4L Ford Duratorq engine and the 2.5L Ford “banana” engine. We’re not going to get into the debate between the banana engine being slower but more reliable and the Ford “Durashite” engine (which we personally love and have found to be the most reliable part of our van) here though. All you need to know is that parts for the 2.5L engine are cheaper than the 2.4L, annoyingly cheaper, every single time. This could be a deciding factor for what kind of LDV you buy, but just be aware that they are essentially two completely different vehicles despite sharing the same name and exterior.

An old brochure depicting the many variations of the LDV range.
Where to source parts?
We get our parts from a variety of different sources, depending on how common or specialist they are.
Instore
Our go-to place for parts is MillAuto (AKA Alliance Automotive), or sometimes Euro Car Parts, as both can search parts by your registration number and returns are easy should you order the wrong part. Euro Car Parts also have regular discounts on parts and extras like engine oil on Bank Holidays and at the end of the month (and virtually every other day of the year too).
For more specialist parts like our brake master cylinder we used to turn to Wessex DAF, a global company who supply parts for DAF lorries but could also source various LDV parts (for a hefty price). Their prices were similar to LDV Parts Direct and were also particularly helpful to speak to about any problems we had. Many times we’ve been up to our local DAF garage to pick their brains, and their knowledge is surprisingly broad considering they haven’t worked on LDVs for around 13 years now. Additionally the folks at DAF back in the UK can most likely liaise with DAF garages abroad, helping you to help them locate the correct parts for your van. Unfortunately, as of 2021 Wessex DAF was acquired by Adams Morey Ltd. and suspended all ties with LDV parts manufacturers.
MillAuto is a local subsidary of Alliance Automotive Group, who have stores across the continent.
Online
While eBay is often the cheapest and does sometimes offer parts that are unavailable elsewhere, it is our least favourite option. Partly because the parts are often unbranded and without a warranty, and partly because it is hard to figure out whether what you are looking at is indeed the correct part. They do have a make and model search system but it often excludes any results where the seller may not have listed your van type, even if the part is correct, plus sellers usually warn you not to use it and to check with them personally as eBay’s system is often incorrect. Also if your van is broken down and you need it urgently back on the road, waiting 3-4 days for shipment and then potentially waiting another week or two should you need to return the part is a bit of a headache. To ensure we get the correct part, as many of them are incorrectly listed, we have started to search through the listing details for the phone number of a company who are usually happy to help you identify if the part you are looking at is correct or not.
LDV Parts Direct is a comprehensive stockist of original and third party aftermarket parts for various LDV models throughout the years. It’s fairly expensive but you can trust what you’re buying to be of excellent quality along with great customer service. There is also a European domain selling various parts for LDVs although we haven’t personally used their services.
Over on Facebook, Sean Turnbull administrates one of the various LDV pages (LDV VANS AND CONVERTS ©, LDV Converts, Club LDV Etc.) and is an excellent source of knowledge along with a huge arsenal of original factory and secondhand parts available.
Finally, whilst we used to be able to rely on scrapyards to find a secondhand part quickly and cheaply, those days are now numbered as dwindling levels of LDVs continue to exist. People have realised their worth and are now clinging on to the remaining vehicles, or selling them for hugely inflated prices compared to just a few years ago. You can still search eBay and Facebook Marketplace for people breaking LDVs who are willing to post parts, but there is no reliable indicator or quality or longevity.

Above: LDV PARTS DIRECT Below: LDV PARTS EU

Buying parts abroad
As previously mentioned, you will probably not get very far asking a foreign garage to source parts for your LDV. Garage-bought parts nearly always work out more expensive, but if the part in question is something LDV-specific you might just be out of luck anyway. We were once taken to a DAF garage in Spain, but they completely ripped us off, charging us over ten times the prices of what the parts would’ve cost in the UK without prior warning.
Since that incident we’ve found it best to buy parts on eBay that can be shipped abroad, or asking members of our family to post out parts to us that we can collect from a local post office. This often works out cheaper than buying the parts from a garage, but sometimes it can be your only option, like when we broke down in Montenegro, the only country possibly in the world that doesn’t know what a Ford Transit is.
Always carry a basic selection of spares with you; wheel cylinders, brake pads, wiper blades, bearings, fuses, or in our case a spare starter motor and wiper motor too. Odds are it’ll be something totally different that breaks, but you’ll be glad you didn’t leave that spare starter motor you had lying around behind when your van decides it won’t start on top of a mountain somewhere.

Lucy’s dad taking our engine apart.
Asking for help
Never be afraid to ask for help! Although we’ve replaced virtually every part on our van over the last few years there’s still many times when we’ve been stuck and need the help and advice of fellow LDV owners, although some of the problems we’ve had in the past have stumped even the experts!
Aside from talking to companies like DAF and LDV Parts Direct, searching out fellow LDV owners who may have had similar experiences on social media sites like Instagram and Facebook is your best friend. There are some really helpful groups on there full of wise, experienced people, ex-LDV technicians and people who just love LDVs like on LDV VANS AND CONVERTS. These people are just happy to help keep LDVs on the road and are passionate about these iconic British vans.

A helping hand from some friendly mechanics in Macedonia.

M E C H A N I C A L
Kingpins
If you’ve landed on this page odds are you’re here because your LDV failed its MOT, or the steering is really bad and you want to know why (spoiler alert: it’s an LDV, that’s why).
Fortunately we have a handy guide on changing kingpins on an LDV Convoy; you can do this yourself and save £££’s, so it’s worth investing in a couple of pieces of equipment to make the process cheaper and easier.

Changing or greasing your kingpins doesn’t have to be stressful.
Knowing what to look for…


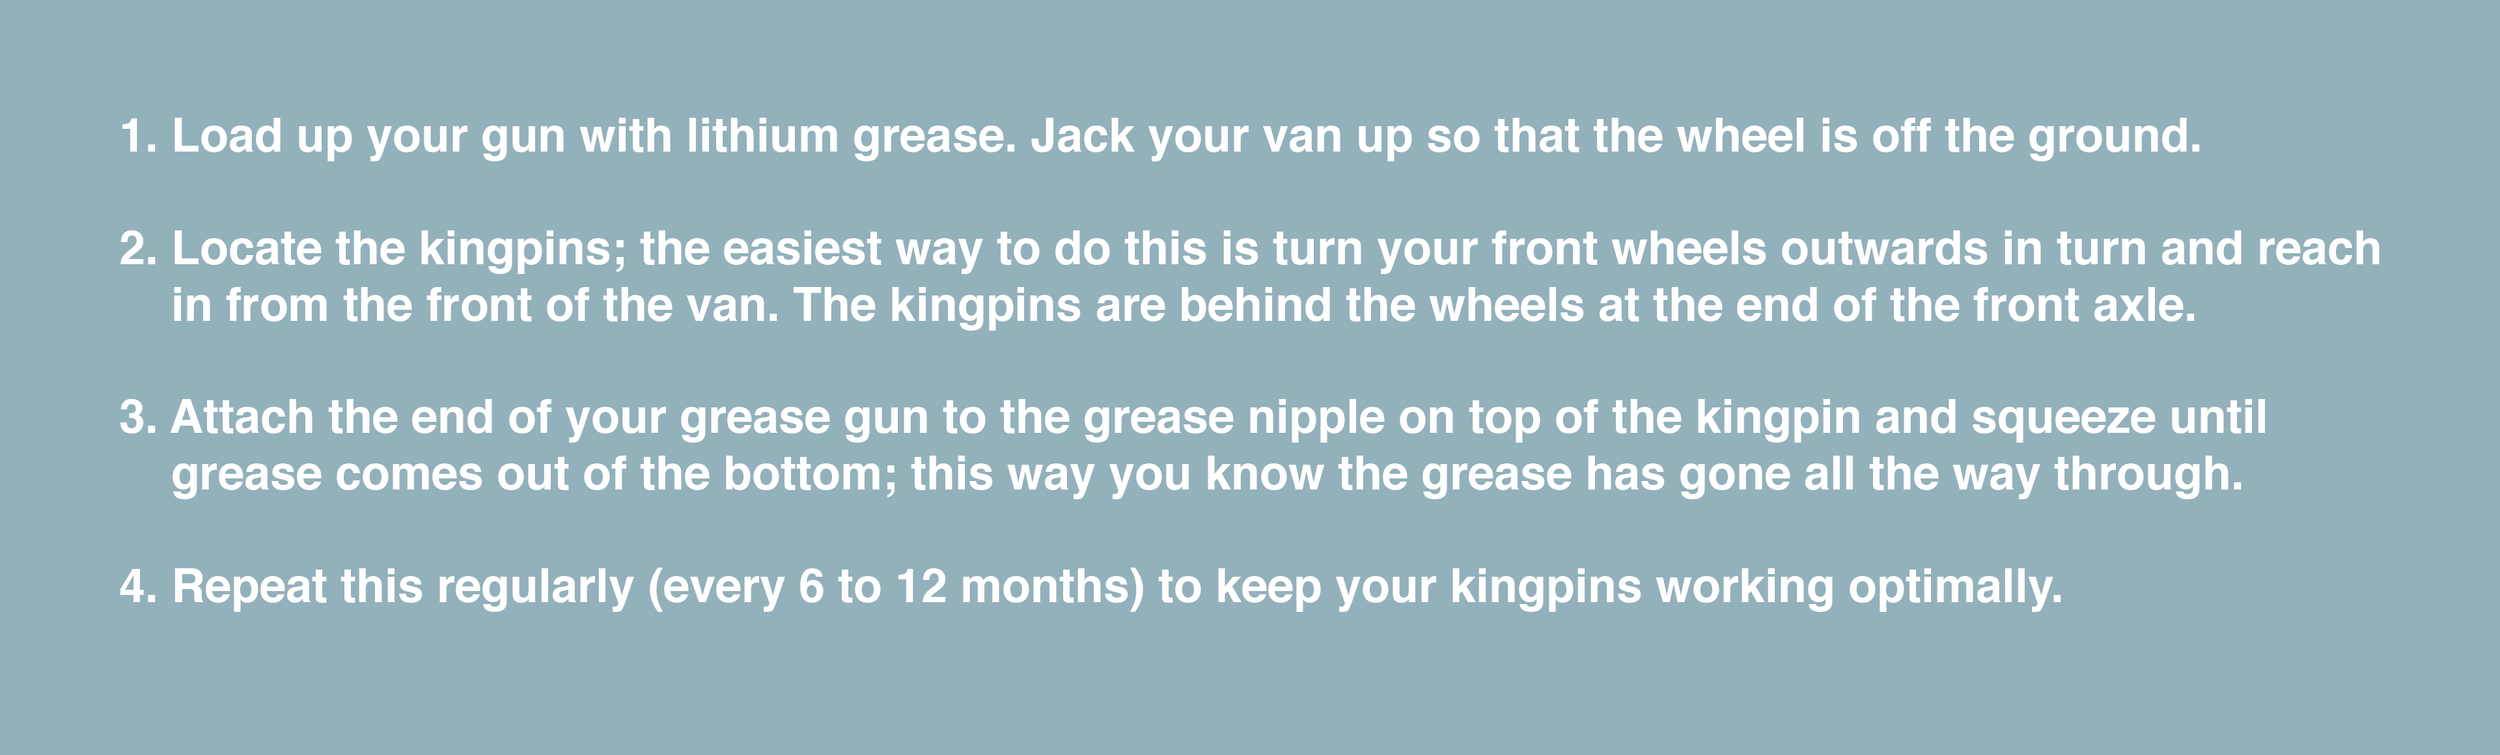
Greasing kingpins on an LDV Convoy
Firstly, if your LDV convoy hasn’t failed its MOT on kingpins: good for you! You’re part of an elite club with just a few members, and you’re going to want it to stay that way. This is a warning to LDV owners and in fact all van owners: grease your kingpins! Make this part of your yearly or bi-annual van maintenance, and hopefully you won’t end up back at this guide a few months down the line.
To do this you’re going to need these two essential items:


Once you’ve got your tools ready, follow these simple instructions to grease your kingpins:
Replacing kingpins on an LDV Convoy
Sadly if your kingpins haven’t been maintained, if they’re rusty and seized or your MOT guy is shaking his head at you as he hands you a list of failures, then you’re going to need to replace the kingpins altogether.
This is a heavy duty job that requires a medium level of mechanical skill, or a dad you can bribe with a few beers.
Note: The following method uses a hydraulic press and requires removing the front axle. You may wish to refer to the workshop book here for official LDV instructions.

Removing the front axle to easily access and remove the kingpins.
You will need:
LDV Convoy kingpin set - £35
6T hydraulic press- £78
Grease gun- £14.50
Lithium grease- £8.49
Note: You don’t need to have a hydraulic press; you can beat the old kingpins out using a hammer and a correctly sized piece of metal, however removing the old kingpins and inserting the new ones is a lot easier and causes significantly less damage with a press.
How to replace kingpins on an LDV Convoy:


Old vs New kingpin set. Can you tell which is which?


Pushing out the old kingpins using the hydraulic press.

New kingpin going in.
We were quoted £400 by a garage to do this job, and all it cost us was £124 and an afternoon’s work. But an ounce of prevention is better than a pound of cure as they say, so grease your bloody kingpins!
Found this article helpful? Please consider chipping in a few quid towards the running costs of this website. Plus breakdown cover's expensive, you know?


M E C H A N I C A L
LDV Convoy Wipers
LDV Convoy wiper motors and their racks are shite. There, we said it. In this guide we’ll show you how to remove the motor, the rack and then throw it all in the bin and buy a new van. Joking- sort of.

A freshly snapped wiper motor, putting our tally of broken ones up to six.
Wiper motor
The wiper motor is overpowered and under-supported by a thin aluminium bracket, which cannot withstand the throw of the wiper arm. This leads to broken wiper motors, broken linkages and broken dreams.
We are personally on our sixth wiper motor now, and the best advice we can offer is this:
Never use the wipers on their fastest setting. Ever.
This may not prevent the motor from breaking altogether, but it will help to prolong its life. As will ensuring it is correctly fitted to minimise strain on the linkage, and perhaps also reinforcing it with an extra steel bracket if you’re a dab hand at welding.
Anyway, we’ve become inadvertent experts at LDV Convoy wiper motor removal by now, so here’s how it goes. You can also find instructions in the LDV Convoy body workshop manual at the bottom of this page.


How to replace the wiper motor on an LDV Convoy:

Wiper rack
If you’ve landed on this page because you’ve heard that changing the wiper rack on an LDV Convoy might somehow stop water pissing in to your footwells, I’m sorry to tell you that it’s a myth.
A very small amount of water may well ingress through the spindles, but there’s a a whole other world of leaks that you should address first before coming to this conclusion (see our Rust and Leaks guide for more). We say this out of concern, as spare LDV Convoy wiper linkages are about as rare as rocking horse shit, and therefore very difficult to get hold of, so please save them for those of us who really need them.
If your wiper rack has indeed broken, it’s clunking with the wipers on or one of your wipers (most likely and conveniently the driver’s side) is sitting there limply refusing to move, you’re going to need to remove it for service.


How to remove the wiper rack on an LDV Convoy:

There you have it. If you’d like a more detailed list of instructions, head over to page 99 of the LDV bible here.

M E C H A N I C A L
Starter motor
Changing an LDV Convoy starter motor is a relatively straightforward job, which is great because it’s something we’ve had to do many, many times. Read on to learn how to remove your starter motor in a few simple steps.

The starter motor is located above the front axle, behind the oil filter and close to the sump.
We’ve been through no less than six starter motors in the time we’ve had our LDV. Granted, we do a lot of driving, particularly in the Winter when the cold engine requires extra cranking, but even so this is an obscenely high number, particularly when a starter motor breaks en route back to the UK, on the verge of a Europe-wide lockdown.
The lesson here is this: don’t buy cheap starter motors. Such an integral part of your van is worth spending the money on for a quality unit, or on refurbishing your old one. If you’re eyeing up the £60 RTX starter motor on Euro Car Parts or eBay- forget it. These units will fail on you in less than a year. Yes, Bosch is expensive, but it won’t leave you stranded up a mountain, or outside your MOT garage that’s just issued you a pass.
If you’re having problems with your LDV Convoy starter motor, such as a grinding sound like a bag of nails when starting your van, your engine clicking but not turning over, or your starter motor becoming permanently engaged with the engine running (you will know if this is the case, because your eardrums will be hurting), then it’s probably time to change it. The usual culprit is the bendix inside which is prone to breaking on cheaper models; getting your old starter motor refurbished at an electro diesel specialist is an alternate option to buying a new one, if you can afford to wait around.
Removing the motor is a fairly straightforward job, but the LDV Convoy starter motor location on a Ford Duratorq 2.4D engine is awkward to get to and involves some electrical work, so best to hand the job over to someone else if you’re not confident in this area.
How to remove the starter motor on an LDV Convoy:

The starter motor is located above the front axle, behind the oil filter and close to the sump.

M E C H A N I C A L
Brakes
In this section we’re mostly going to moan about how bad the brake master cylinder is on our LDV Convoy. We’re hoping that you aren’t having the same issues with yours, but you probably wouldn’t have landed here otherwise…
If you’d like information on any aspect of the braking system for an LDV Convoy or any other LDV or Leyland model, please head to the bottom of this page for a comprehensive list of workbooks.
Brake master cylinder

Our latest brand new brake master cylinder.
If a part of our van was likely to be cursed, it would be the brake master cylinder. These are supposed to last the life of the vehicle, yet we’ve been though six in seven years. In fact, we’ve probably spent more time driving without brakes than with. Granted, some of this is due to mountain driving boiling our poor minibus brakes, but we were also sold no less than three brand new master cylinders that came faulty off the production line. The inner seals perished within months of driving, and there’s no LDV convoy brake master cylinder repair kit as there’s no way to open this particular master cylinder up and replace them. They’re also around £300 a pop to boot.
There’s also many versions made for different models. Depending on the size, shape and intended use of your LDV, whether the master cylinder has two pipes or one and what the rated payload is, you could have any one of these master cylinder types.
The 3.85T minibus model of LDV Convoy has uprated brakes, which essentially means whenever you’re looking at a choice of brake parts, it’s the biggest, most expensive ones.
We’ll save you a bit of time here: if you have the 2.4D 3.85T minibus model with a two pipe master cylinder like we do, then you need part number PBU1541. This part number is basically lasered onto my retinas with the amount of times we’ve had to buy one of these things.
Removing an LDV brake master cylinder needs no how-to guide; it’s simply two nuts holding on the brake lines, and two nuts to detach it from the servo, as well as unplugging the wires which go to the reservoir on top.
Air in our brake lines has caused no end of problems, as when brake fluid gets hot and boils it separates; this creates air in the system at the wheel cylinders, which in turn reduces braking power. We’ve also been known to crack our brake shoes in the past too. Crucially here, LDVs weren’t made to drive up mountains.


M E C H A N I C A L
Fuel
We’ve always been told that if our fuel pump broke the process would be so costly and time-consuming to repair that we might as well get a new van. Well, that’s not exactly true…
In this section we’ll talk fuel pumps, filters, leaks and EGR valves.

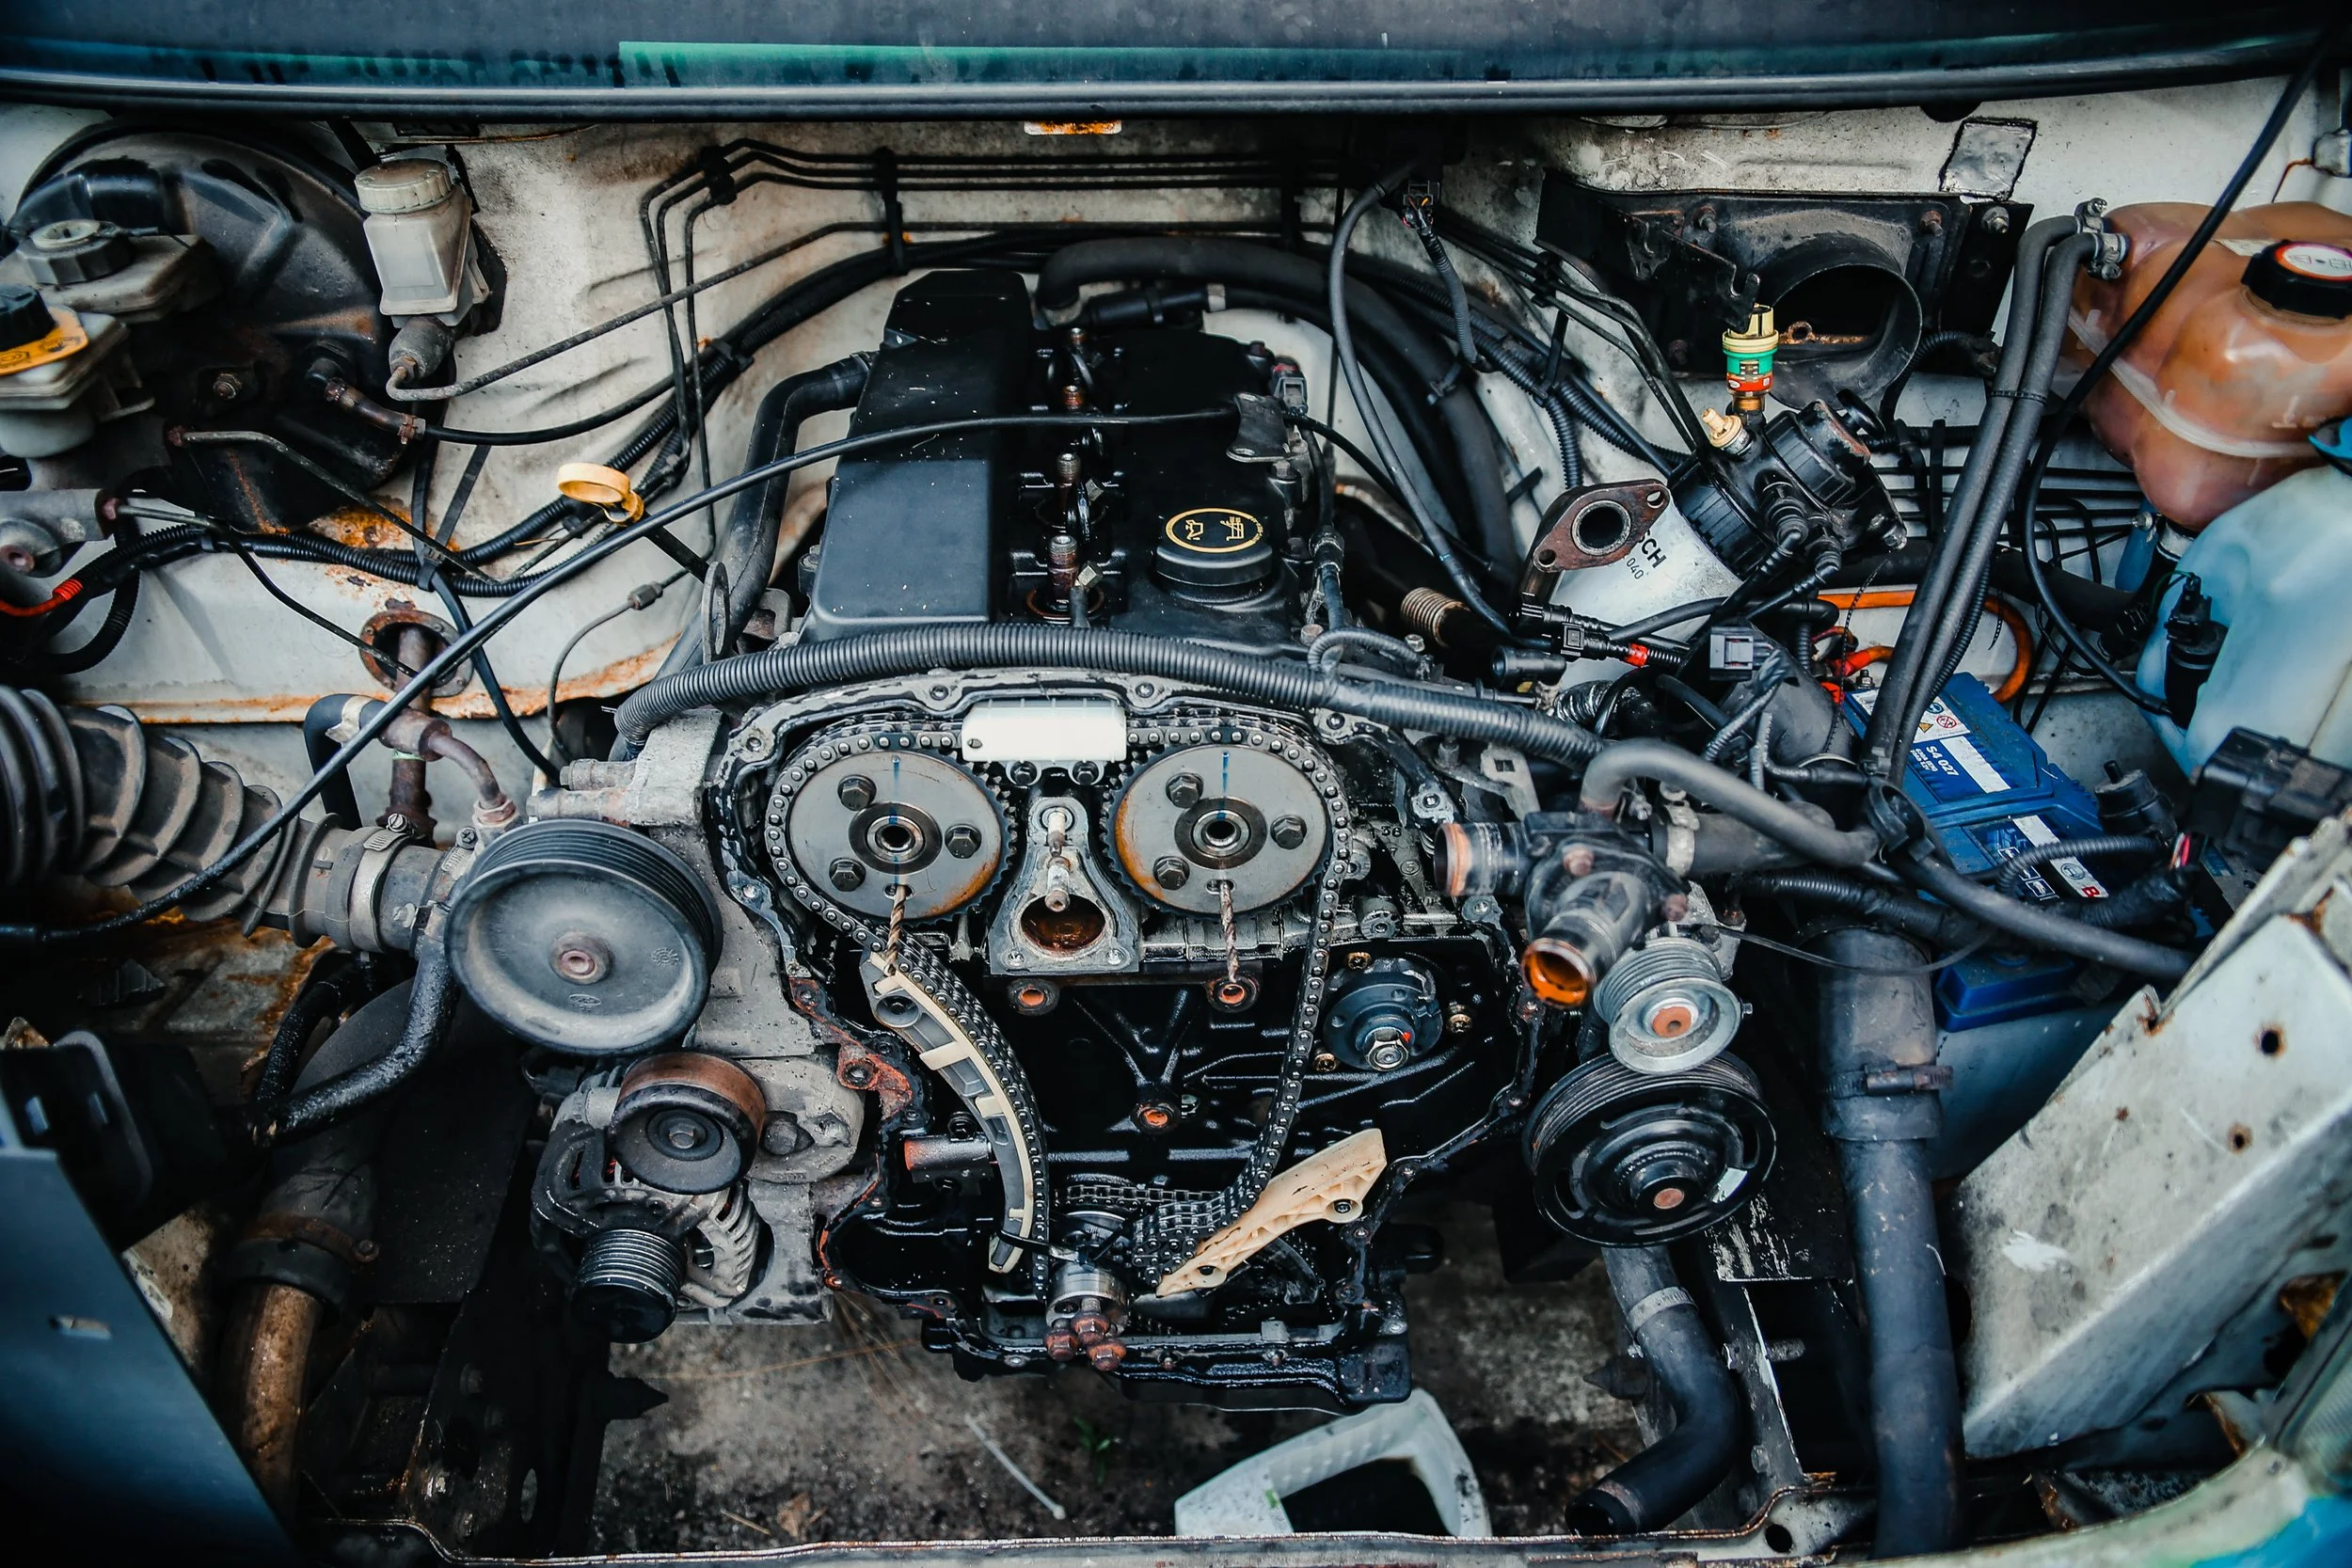
Stripping down our engine to reach the fuel pump.


Fuel pump
We believe our fuel injection pump malfunctioned as a result of getting water in our fuel; it’s likely that this eventually caused the inside of the fuel pump to rust.
Diagnosing the problem is difficult, because you want to be really 100% sure you’re dealing with a knackered fuel pump before you go tearing out half the engine to replace it. So a process of elimination is required, but hopefully we can save you some time with what we’ve learned.
Firstly, if your LDV Convoy diesel injection pump has failed, you will know about it. Your engine will suddenly die, it will crank but refuse to turn over, maybe with a little smoke. Most importantly, if your van is running your diesel pump is not broken. Too many times we’ve been to garages who’ve tried to tell us that whatever problem we’re dealing with involves the fuel pump- funny how many times ‘honest’ mechanics have come to the same conclusion, that the biggest and most expensive part on our van needs replacing. Hmm.
Secondly, your OBD reader (see diagnosing problems section) will throw up the following DTC fault codes on a Ford Duratorq engine:
P1664: Fuel Injection Pump malfunction, Fuel Injection Pump timing chain tension
P1564: Fuel Injection Pump requesting reduced fuelling mode. The Fuel Injection Pump has identified a fault that may cause damage to the engine. If any other DTCs are present address these first.
There may be other DTCs, but the combination of these two fault codes almost unanimously points to a fuel pump issue, although the OBD reader may throw up all sorts of other codes; make sure you clear these and read it again to ween out any false red flags.
If you have these codes and you’ve eliminated all other possibilities (such as timing, fuel line blockages, fuel injectors etc) then it’s time to replace your fuel pump.

Stripping back the engine to reach the fuel pump.
You will need to locate a Bosch VP30 fuel pump, which are commonly used in Ford, Opel and Rover engines; usually these are around £900 brand new, but it is possible to buy a refurbished model. One company we recommend is Diesel Technika in Poland, who we bought a unit from for £420, and sent our old one back to be renewed. There are also a handful of UK electro diesel companies doing this, so check your local area to see what options are available.

Old vs New. Side by side comparison of our old Bosch VP30 and its new replacement.
Now, here’s where things get tricky.
The diesel injection pump is coded to your ECU, as part of your van’s anti-theft system. If you install any old secondhand pump that is coded to another engine it will not work. The only way to get around this is to buy a decoded or virginised fuel pump, which will code itself to your van when installed (read on for important information on this process). It’s also possible to buy a secondhand one and get it decoded by a specialist, or indeed to purchase the software and do this yourself if you know how, but we personally do not feel that installing such a crucial piece of kit that is untested and potentially prone to failure is worth the gamble.
An electro diesel company will charge around £50 - 80 for this service, and the software (Laser 2000) costs around the same.
Now you’re just about ready to remove the fuel injection pump. This is advanced mechanics and will require a great deal of skill and patience. You may also want to change the timing chain and alternator belts while you’re in there, if it hasn’t been done already. You will ideally need a timing tool kit which will make the job a lot easier, but read on to find out what we did instead.
Download the LDV Convoy body service workbook at the bottom of this page for details on the following process.
Removing the diesel injection pump on an LDV Convoy:


How to code a new Bosch VP30 fuel injection pump to a Ford Duratorq engine:

This is one of the most difficult procedures to perform on a van, and we have compiled this information for you based on weeks of scouring Internet forums, speaking to companies and of course from personal experience, so we hope if you’re experiencing these same problems with your LDV Convoy diesel pump that this guide will help you to save some time, answer some tricky questions and get your van back on the road a bit quicker.
Found this article helpful? Please consider chipping in a few quid towards the running costs of this website. Plus breakdown cover's expensive, you know?

Fuel filter
There’s not much to add here, except that if you didn’t know already, LDV Convoy diesel filters are shite. The housing has been designed by someone who doesn’t actually want you to use it. The bleed nipple to remove accumulated water lives on the bottom of the housing, and is very tight and awkward to unscrew; it’s easier to unbolt the fuel filter altogether if you can, but don’t disturb the lines or you risk getting an airlock.
Speaking of airlocks, if you want to prime the system by pumping up diesel, forget about it! The pathetically small pump on the top of the housing is about as useful as a chocolate teapot. Instead, we recommend using a diesel priming tool, or making one yourself. Carry it with you; you’ll never know when you may end up needing it. Like, for instance, if you end up with watered down diesel from a dodgy garage…

Fuel leak
Having a fuel leak in your van is a pain in the ass; you’re driving along watching your fuel gauge drop rather more rapidly than usual, and your hard-earned money spilling all over the tarmac.
In our case, we managed to narrow the leak down to the return pipe above the fuel tank. If it only leaks when the van is running this is a likely culprit.
A good way to investigate the problem initially is to give the underneath of your van a good jetwash, then when you next take it for a run hopefully you’ll be able to see a pattern of diesel emerge.
If you’re certain the leak is above the fuel tank and not anywhere else along the lines, here’s what to do next.
How to drop the fuel tank on an LDV Convoy:


EGR valve
If your LDV Convoy is suddenly losing power, such as when climbing steep hills or driving at speeds of over 60mph, you might well have an issue with your EGR valve.
We had exactly this problem with our van; the speed would drop by about 15mph and refuse to climb again, and the engine management light would start flashing on the dashboard (it doesn’t do that anymore; we wore the bulb out).
To test this theory, you can give your EGR valve a firm tap with a hammer, and the next time you start the engine it should drive normally again, for a while. This is because the bellows inside the valve can become gummed up with oil and stick, causing the sensor to identify a fault and send your van into limp mode. The LDV Convoy EGR valve is located in front of the diesel filter, to the right of the inlet manifold intake. It’s also possible that the EGR valve sensor is faulty, but as these can’t be bought separately you’ll need to change the whole EGR valve anyway. You can also try cleaning your old EGR valve with carburettor cleaner to see if that cures the problem.
Additionally, the following DTC fault codes may be present:
P0409 - EGR valve position sensor
P0404 - EGR valve position control performance or range fault
You can buy a blanking kit for these, or fashion your own, to prevent further issues down the line. Overall it’s a cheap and simple repair, and should stop your van suddenly dropping in speed.
How to remove an EGR valve on an LDV Convoy:


M E C H A N I C A L
Wiring
LDVs have dodgy wiring. It’s a fact. Whoever was building these vans clearly got lazy by the end and started throwing in wires and earths wherever they felt like it, because we have experienced constant issues with our headlights, stereo and engine starting. In this section we’ll share examples of issues we’ve had and our ongoing efforts to repair them.
Our headlights have been known to stick on full beam unless we turned them fully on and off, or sometimes only one would work. One time the van stayed running even after we’d turned the ignition off, and only when we turned the headlights off the engine cut out!
You can download the wiring guides for various LDV and Leyland models at the bottom of this page.
We’ve also had various electrical quirks like the horn turning the stereo off, and most recently the engine refusing to start due to a dodgy engine earth cable, which we got around by wiring a new earth to the slam panel as a temporary measure.
Sadly we don’t have an actual solution for these problems, apart from just tackling them as they appear. But we’ve had another mystery issue that’s plagued us for several years now…
Ever since we hit a big bump driving in Albania, our van has been in reduced fuelling mode. The engine management light (MIL) came on, the odometer and speedo stopped working and the van was missing about 20% from the top of each gear in terms of power.
According to an ECU doctor we spoke with, our engine shouldn’t even be running.
We’ve done over 20,000 miles since this incident, and it’s saved us a bit of money on fuel. But it’s not ideal.
Reading the OBD the following DTC fault codes presented:
P1343 - Accelerator pedal position sensor B circuit
P0409 - EGR valve position sensor
P0404 - EGR valve position control performance or range fault
P1666 - FIP crank reference synchronisation
P0149 - Fuel timing error reported by FIP
P1564 - FIP requesting reduced fuelling mode
It’s important to note that often codes P1564 and P0149 are often a symptom of another problem, rather than being an issue in themselves. The fuel injection pump can request reduced fuelling mode for a variety of reasons, to protect itself from a perceived possibility of damage.
We’ve just about narrowed our problem down to the engine’s main wiring harness, in particular one circuit that is highlighted in blue in the diagram below:
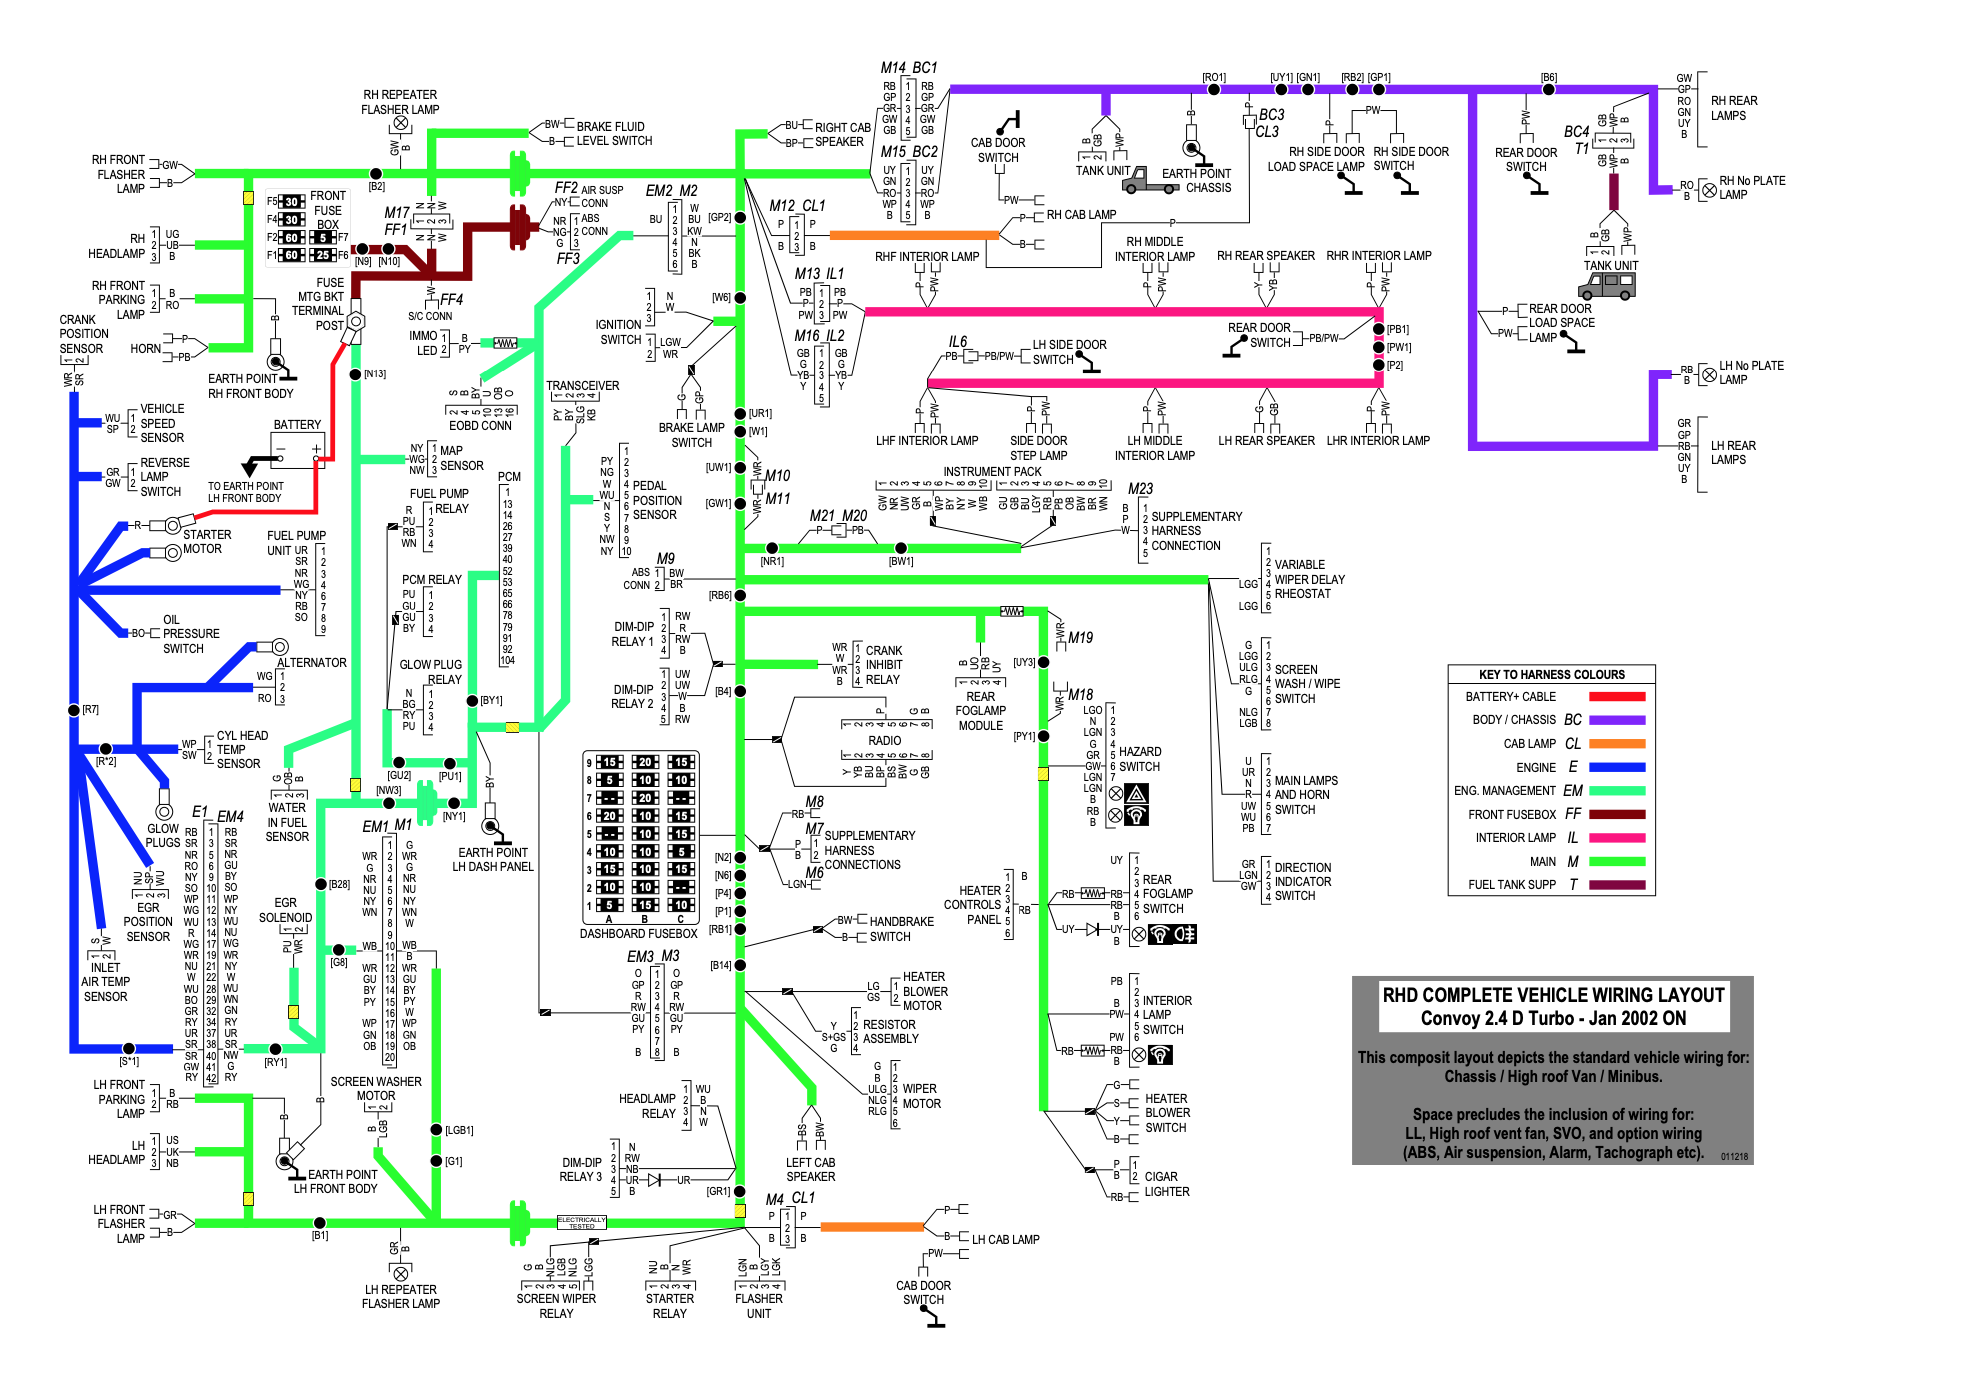
We had issues with this harness on the outskirts of Toulouse in France, when our engine suddenly cut out, simultaneously blowing the PCM fuse on the dashboard. This also happened conveniently on the eve of the French summer holidays, when all the garages were shutting up shop for 3 weeks.
We had no choice but to inspect the wiring harness ourselves in the courtyard of the tow truck garage, and managed to find a few chafes in the wiring harness casing, which was causing it to short circuit on the metal of the engine. This is a bit of a design flaw with the Ford Duratorq engine, as ideally the main wiring harness wouldn’t be running over the top of the engine where it is vulnerable to vibrations.
We patched it up with yards of electrical tape and a plastic bottle, and miraculously this fixed lasted us al the way around Europe and back again.
We’ll update this page if we ever manage to uncover the reason our LDV is stuck in limp mode.
ECU
If you haven’t yet wrapped up your LDV Convoy ECU in a sandwich bag with cable ties, we ask that you stop reading immediately and go and do so. This is Day One LDV shit right here.
LDV Convoys leak. They’ve leaked since they left the factory. They’ll continue to leak for the duration of ownership and there’s nothing you can do about it. (Well, almost nothing- read our Rust and Leaks guide for tips on how to stem the flow).
Don’t do what we did and leave your poor ECU to get leaked on in a thunderstorm, because it may well just break and leave you stranded. Fortunately a garage managed to uncover the problem for us, albeit at vast expense. We can’t speak for all vans, but for us the sign that we had water in the ECU was that our engine started but then immediately cut out. It would run as long as we had a foot on the accelerator, but left to idle and the engine would die (see this video from Montenegro). The other obvious sign was that water came out of our ECU when it was held upside down.
Fortunately, the mechanic was able to remove it, dry it out and pop it back in again, but the components inside have rusted somewhat and we think this may cause us issues further down the line.

If your ECU looks worse than ours, I will personally eat the contents of this sandwich bag.

M E C H A N I C A L
Steering
The steering on an LDV Convoy is shite. Are you sensing a general theme in this article?
It’s sloppy, it’s unresponsive, it wanders all over the road; you can turn your steering wheel a half turn before it even does anything. And guess what? There’s bugger all you can do about it. But we love it really…
You really only have a few options when it comes to fixing steering play on an LDV Convoy:
#5 Upgrade or replace the steering damper
#6 Check and replace the steering ball joints
#7 Replace the steering box
#8 Learn to live with it
#1Tighten the steering rack
#2 Adjust the steering box
#3 Get your tracking realigned
#4 Grease your kingpins
Options 1, 2, and 3 are pretty futile. They may help you scrape through your MOT and will set you back a few quid extra at a tyre garage, but things will return to normal pretty soon. Greasing your kingpins is essential to keeping your van roadworthy and the best thing you can do for your LDV steering.
The next three options are a case of investigation, trial and error. Many people have changed their steering boxes to great success; for us it didn’t make much difference. It’s a heavy job that costs a few £££ to get done at a garage, so you may not feel it’s worth taking the risk. Replacing the drag link arms and the track rod ends can significantly improve the steering, or just stop your van clunking over every bump.
Upgrading to a return to centre steering damper is an option among LDV enthusiasts, although we much prefer the eighth and final option on the list: learn to live with it.
Yes, the steering on an LDV Convoy is more akin to a sailboat than a van, but it gives your arms a good workout and keeps your eyes on the road. Love them or hate them, they are what they are: cheap and cheerful British vans.
M E C H A N I C A L
Propshaft
The propshaft on an LDV Convoy really isn’t that different to any other van- it even uses Land Rover parts! In this section we’ll show you how to change the propshaft bearings.
If you have a failing propshaft bearing the signs to look out for are shuddering when taking off and a whining or grinding noise when decelerating (not accelerating) or reversing. A visual inspection might reveal visible rust residue.
The propshaft has a total of three bearings: two universal joints, and a centre bearing which is round. The universal joints are the same as those from an original Land Rover Defender 110, which is handy to know if you’re in a pinch as these are usually easier to get hold of.
How to change propshaft centre bearing and universal joints on an LDV Convoy:


M E C H A N I C A L
LDV Workshop manuals
Do you desperatly need to know the torque wrench settings for the alternator bolts?
Or perhaps you have a burning desire to know what LDV officially recommended for drying your van after a shampoo? No, us neither*. But the following section will tell you just that and much more.
* It’s a chamois leather, of course.
The following list is the most comprehensive compilation of Service Workbooks for Leyland DAF and LDV vehicles on the web.
We’ve renamed them and organised them in to a coherent list. You are able to download them or view online. We really hope this helps the dwindling group of enthusiasts to keep these beauties on the road.
There’s lots of crossover throughout the years on various Leyland DAF and LDV models. For example, many aspects of the steering, brakes and suspension service workbook for the 200/300/400 series will be the same for later models. Please check and research carefully before attempting any work you are unsure of.
Found this article helpful? Please consider chipping in a few quid towards the running costs of this website. Plus breakdown cover's expensive, you know?

LDV Files
Axles
LDV Service Workbook - Axles - Rear Axles - 200, 300, 400
LDV Service Workbook - Axles - M226 Rear Axle Supplement
Body
LDV Service Workbook - Body - 200, 400, Pilot, Convoy
LDV Service Workbook - Body - Tipper - Convoy - 1997 Onwards
LDV Service Workbook - Body - Tipper Supplement - Convoy - 2001 Onwards
Electrics
LDV Service Workbook - Electrics - Vehicle Wiring - All Models - 1987-1992 (RHD)
LDV Service Workbook - Electrics - Vehicle Wiring - All Models - 1994-1995 (RHD)
LDV Service Workbook - Electrics – Vehicle Wiring - All Models - 2002 Onwards (RHD)
LDV Service Workbook - Electrics - Vehicle Wiring - Pilot, Convoy - 1999 Model Year To December 2001 Supplement (RHD)
LDV Service Workbook - Electrics – Vehicle Wiring - Pilot, Convoy - Convoy Bifuel Supplement (RHD)
LDV Service Workbook - Electrics - Vehicle Wiring - Pilot, Convoy -1996 Onwards (RHD)
Engine
LDV Service Workbook - Engine - 2.4 Duratorq Diesel - Convoy - 2002 Onwards
LDV Service Workbook - Engine - 2.5 Di Diesel - Convoy 1997-2001
LDV Service Workbook - Engine - 2.5 Di Diesel Epic Management System - Convoy - 1997-2001
LDV Service Workbook - Engine - 2.5 Di Diesel Immobilisation - Convoy
LDV Service Workbook - Engine - Dw8 - Pilot
LDV Service Workbook - Engine - EN55, ET70 - 400
LDV Service Workbook - Engine - O Series - Sherpa K2, 200
LDV Service Workbook - Engine - V8 Petrol - 300, 400
LDV Service Workbook - Engine - V8 Petrol Changes Supplement - 300, 400
LDV Service Workbook - Engine - Xud9a - Pilot
LDV Service Workbook - Engine - Xud9a Workbook Supplement - Pilot
Maintenance
LDV Service Workbook - Maintenance - Anticorrosion Inspection Sheet - Pilot, Convoy
LDV Service Workbook - Maintenance - Battery Storage And Maintenance
LDV Service Workbook - Maintenance - Dealer Predelivery Inspection - Pilot, Convoy, Cub
LDV Service Workbook - Maintenance - Fault Codes - Maxus
LDV Service Workbook - Maintenance - Final Vehicle Checklist
LDV Service Workbook - Maintenance - Minibus Inspection Check Sheet
LDV Service Workbook - Maintenance - New Vehicle Delivery Receiving And Storage
LDV Service Workbook - Maintenance - Receiving Inspection - New Vehicle Storage Card
LDV Service Workbook - Maintenance - Scheduled Maintenance - 2.5 Di + Xud9a Diesel Engine Supplement
LDV Service Workbook - Maintenance - Scheduled Maintenance - Convoy - 2002 Onwards
LDV Service Workbook - Maintenance - Scheduled Maintenance Diesel Engined Vehicles - 1989 Onwards
LDV Service Workbook - Maintenance - Scheduled Maintenance Pilot, Convoy Diesel Engined Vehicles
LDV Service Workbook - Maintenance - Service Job Sheet - 200, 400 Diesel Models - 1989 Onwards
LDV Service Workbook - Maintenance - Service Job Sheet - 200, 400 Diesel Models - 1994 Onwards
LDV Service Workbook - Maintenance - Service Job Sheet - 200, 400 Petrol Models - 1989 Onwards
LDV Service Workbook - Maintenance - Service Job Sheet - Convoy LPG - 2000 Onwards
LDV Service Workbook - Maintenance - Service Job Sheet - Pilot, Convoy - 2002 Onwards
LDV Service Workbook - Maintenance - Service Job Sheet - Pilot, Convoy Diesel Models
LDV Service Workbook - Maintenance - Service Job Sheet - Pilot, Convoy Inclusive LPG, Cub - 1999 Onwards
LDV Service Workbook - Maintenance - Service Job Sheet - Pilot, Convoy, Cub - 1998 Onwards
LDV Service Workbook - Maintenance - Service Job Sheet - Pilot, Convoy, Cub - 1999 Onwards
Steering, Suspension and Brakes
LDV Service Workbook - Steering, Suspension, Brakes - 200, 300, 400
LDV Service Workbook - Steering, Suspension, Brakes - Air Suspension - All models - 1996 Onwards
LDV Service Workbook - Steering, Suspension, Brakes - Air Suspension Ecas1b Supplement - Convoy - 2001 Onwards
LDV Service Workbook - Steering, Suspension, Brakes - Brake Pad Part Numbers - All Models
LDV Service Workbook - Steering, Suspension, Brakes - Power Assisted Steering - All Models - 1995 Onwards
LDV Service Workbook - Steering, Suspension, Brakes - Power Assisted Steering – A Board Mounted Burman Steering Box
LDV Service Workbook - Steering, Suspension, Brakes - Provisional Information Anti-Lock Braking Abs - Convoy
Transmission
LDV Service Workbook - Transmission - A4ld Automatic - Convoy
LDV Service Workbook - Transmission - Gearbox MT-75 - Convoy - 1996
LDV Service Workbook - Transmission - Gearbox MT-75 Single Rail Gearbox - Convoy - 1996 Onwards
LDV Service Workbook - Transmission - Gearbox P5-100 - 1994
LDV Service Workbook - Transmission - Gearbox R5-150
LDV Service Workbook - Transmission - Gearbox R5-150 Supplement
LDV Service Workbook - Transmission - R380 Gearbox J,K, L - 200, 400, Pilot, Convoy with V8 Engine
Leyland DAF Files
Axles
Leyland DAF Service Workbook - Axle - V200, V400 Rear Hubs And Oil Seals - 200, 400
Engine
Leyland DAF Service Workbook - Engine - 1.5 Diesel - 1980
Leyland DAF Service Workbook - Engine - 1.8 Diesel - Sherpa K2, 200
Leyland DAF Service Workbook - Engine - 02 Petrol - 200
Leyland DAF Service Workbook - Engine - Bn 52
Transmission
Leyland DAF Service Workbook - Transmission - Automatic - 300, 400
And there you have it, you’ve reached the end. If you’ve read the entire page then we’ll take our hats off to you. You either have lots of time on your hands or lots of problems with your van. We salute you nonetheless! Please feel free to drop us a line below and we’ll try our best to get back to you.
You can also follow us on Facebook, Instagram, YouTube and Patreon.